Gauged porcelain tile (GPT) and large-format porcelain slabs have become increasingly popular in Denver-area homes for their sleek, modern appearance and minimal grout lines. However, these thin, oversized tiles (often 3-5 feet long and only 6mm thick) demand installation precision that goes far beyond standard ceramic tile. Understanding how your substrate, setting materials, and installation method work together can mean the difference between a stunning floor that lasts decades and one that develops cracks or "lippage" (uneven edges) within months—especially important given Colorado's challenging climate conditions.
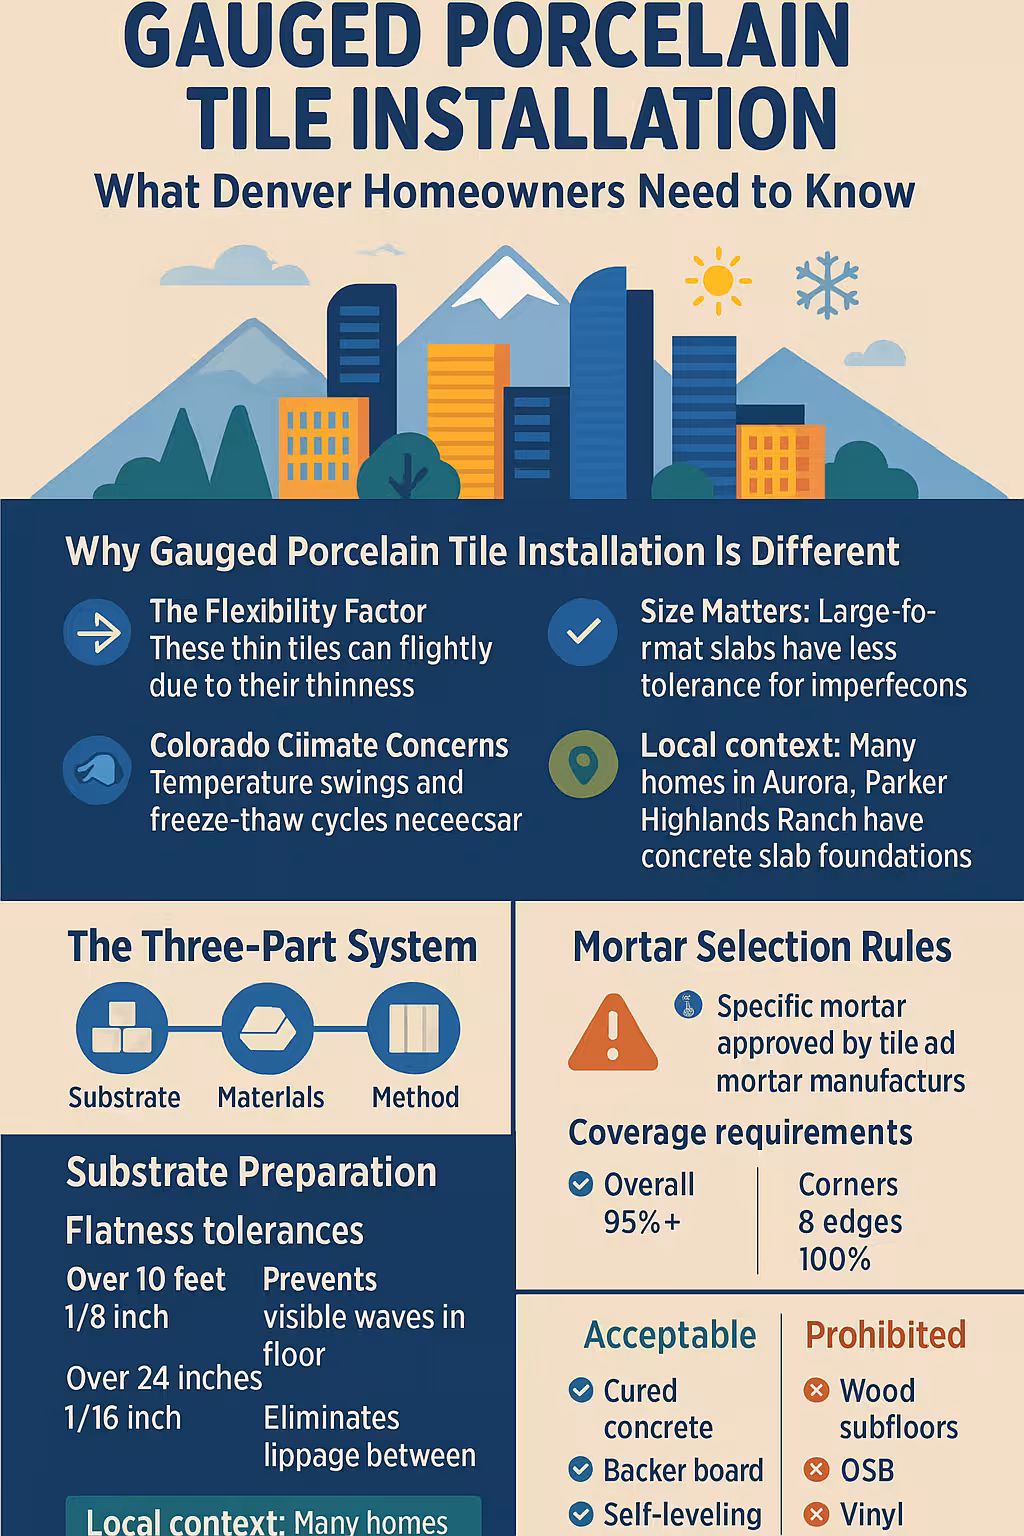
Why Gauged Porcelain Tile Installation Is Different
Unlike traditional ceramic or standard porcelain tile, gauged porcelain products are remarkably thin (typically 6.5mm or less) yet span large areas. This combination creates unique installation challenges:
The Flexibility Factor
These tiles can actually flex slightly due to their thinness, which sounds concerning but is intentional. However, this flexibility means your substrate must be nearly perfect—any dips, humps, or soft spots will telegraph through the tile surface.
Size Matters
A 3-foot tile has far less tolerance for substrate imperfections than a 12-inch tile. If your subfloor has a 1/8-inch dip over 10 feet, a small tile might bridge it, but a large-format slab will follow that contour and create visible lippage.
Colorado Climate Concerns
Denver's temperature swings (from below zero in winter to 90°+ in summer) and freeze-thaw cycles put extra stress on tile assemblies. Gauged porcelain's imperviousness makes it freeze-thaw resistant, but only if installed correctly with proper materials.
The Three-Part System: Substrate, Materials, and Method
1. Substrate Preparation: Your Foundation for Success
Think of your substrate as the canvas for your tile masterpiece. For gauged porcelain, that canvas needs to be nearly flawless.
Flatness Requirements (The Non-Negotiables)
| Measurement | Maximum Variation | Why It Matters |
|---|---|---|
| Over 10 feet | 1/8 inch | Prevents visible waves in floor |
| Over 24 inches | 1/16 inch | Eliminates lippage between tiles |
| From high points | Measured peak-to-valley | Ensures uniform mortar coverage |
Deflection Standards: Rigidity Requirements
Your floor needs to be stiff enough that it doesn't flex under weight:
- Wood-framed floors: Maximum deflection of L/720 (length divided by 720)
- Concrete slabs: L/360 acceptable
- Second-story installations: Require extra attention due to vibration
Acceptable Substrates
✅ Approved:
- Properly cured concrete slabs
- Mortar beds (mud set)
- Cementitious backer board (per ANSI standards)
- Self-leveling underlayment (for correcting flatness)
- Existing tile (if properly bonded and flat)
- Drywall (dry areas only—not for showers)
❌ Prohibited:
- Direct installation over wood subfloors, plywood, or OSB
- Particleboard or MDF
- Flexible vinyl flooring
Preparation Checklist
Before any tile goes down, your substrate should meet these criteria:
- [ ]Surface ground or patched to meet flatness tolerances
- [ ]All high spots removed; low spots filled with appropriate patching compound
- [ ]Substrate is clean, dry, and free of contaminants (paint, oil, curing compounds)
- [ ]Self-leveling underlayment applied if needed (common in Denver basement renovations)
- [ ]Deflection testing completed for wood-framed floors
- [ ]Expansion joints planned and marked (especially important for large open-plan areas popular in Littleton and Highlands Ranch homes)
2. Setting Materials: Not All Mortars Are Created Equal
This is where many DIY installations go wrong. You cannot use standard thinset mortar with gauged porcelain tile.
Mortar Selection Rules
Why? Many large-format tiles have a mesh backing applied after firing. This backing layer requires specific mortar formulations that the tile manufacturer has tested and approved.
Mortar Coverage Requirements
| Area | Requirement | Purpose |
|---|---|---|
| Overall coverage | 95%+ | Prevents voids that lead to cracking |
| Void size limit | No void >2 square inches | Ensures support across entire tile |
| Corner/edge support | 100% coverage | Prevents chipping and edge fractures |
| Trowel notch | Per manufacturer specs | Usually 1/2" × 1/2" or larger |
Installation Method: Most gauged porcelain requires "back-buttering" (applying mortar to both substrate and tile back) to achieve full coverage.
Grout Selection
Grout choice depends on your installation location:
Standard Areas (living spaces, kitchens):
- Cementitious grout meeting ANSI A118.6 or higher
- Epoxy grout for high-traffic commercial applications
Wet Areas (bathrooms, steam showers common in Denver's luxury homes):
- Epoxy grout (ANSI A118.3) often recommended
- Must coordinate with waterproofing membrane
3. Installation Method and Membranes
Waterproofing and Crack Isolation Membranes
Gauged porcelain's thinness creates special considerations for underlayment membranes:
Membrane Compatibility Issues:
- Compressible membranes (thick, cushioned) may not support gauged porcelain under heavy loads
- Liquid-applied membranes (troweled on) provide better support and are generally preferred
- Always verify membrane compatibility with tile manufacturer
When Membranes Are Required:
- All shower and bathroom floor installations
- Over radiant heat systems (popular in Denver's cold climate)
- Areas with known substrate cracking history
- Above-grade installations (condos, second floors)
Movement Joints: Mandatory, Not Optional
Movement joints (also called expansion joints) are required in gauged porcelain installations:
Where Movement Joints Are Needed:
- Perimeter of all tiled areas (where tile meets walls)
- Over structural expansion joints in the building
- At transitions between different flooring materials
- At any change in plane (floor to wall, wall to ceiling)
- In large open areas: approximately every 12-16 feet in each direction
- Around columns and fixed objects
Professional Installation in South Denver
Installing gauged porcelain tile isn't a typical weekend DIY project. The precision required for substrate preparation, the specific material requirements, and the complexity of achieving full mortar coverage make this a job for experienced professionals.
At South Denver Tile Experts, our installation teams are specifically trained in large-format and gauged porcelain techniques, with specialized equipment for laser-level substrate verification and proper thinset application. We serve homeowners throughout Denver, Aurora, Parker, Littleton, and Highlands Ranch, and we've completed hundreds of gauged porcelain installations—from modern open-concept kitchens to luxury spa bathrooms.
Common Installation Mistakes (And How to Avoid Them)
Based on troubleshooting calls throughout the Denver metro area, here are the most frequent issues:
1. Skipping Substrate Evaluation
- Mistake: Assuming your floor is flat enough
- Reality: Most floors aren't—they need correction
- Solution: Professional laser level assessment before purchasing tile
2. Using Incompatible Mortar
- Mistake: Grabbing any "modified thinset" from the hardware store
- Reality: Your tile's mesh backing may require specific formulations
- Solution: Verify compatibility with tile manufacturer before buying
3. Insufficient Mortar Coverage
- Mistake: Standard thinset spreading without back-buttering
- Reality: Large-format tiles need 95%+ coverage to prevent cracking
- Solution: Back-butter every tile and check coverage periodically
4. Ignoring Deflection Issues
- Mistake: Installing over bouncy wood floors
- Reality: Flexing substrates crack rigid tile
- Solution: Reinforce joists or add subfloor layers to meet L/720 standard
5. Skipping Movement Joints
- Mistake: Running tile continuously without expansion joints
- Reality: Colorado's temperature swings will cause cracking or tenting
- Solution: Plan movement joints every 12-16 feet and at all perimeters
Assembly Installation Checklist
Use this checklist for your gauged porcelain tile project:
Pre-Installation (1-2 weeks before)
- [ ]Substrate assessed for flatness (1/8" in 10', 1/16" in 24")
- [ ]Deflection testing completed (L/720 for wood framing)
- [ ]Tile and mortar compatibility confirmed with manufacturers
- [ ]Self-leveling compound applied if needed (allow cure time)
- [ ]All materials acclimated to room temperature
- [ ]Movement joint locations marked on substrate
- [ ]Waterproofing membrane installed and tested (if required)
During Installation
- [ ]Mortar mixed to manufacturer's specifications (ratio and mix time)
- [ ]Proper trowel notch size used (typically 1/2" × 1/2" or larger)
- [ ]Back-buttering performed on every tile
- [ ]Periodically check mortar coverage (should be 95%+)
- [ ]Lippage control systems used (clips/spacers)
- [ ]Movement joints left open (not filled with mortar)
- [ ]Tiles set within mortar open time (usually 20-30 minutes)
Post-Installation
- [ ]Mortar cured per manufacturer timeline (typically 24-72 hours) before grouting
- [ ]Grout joints filled completely (no voids)
- [ ]Movement joints filled with flexible sealant (not grout)
- [ ]Final cure time observed before traffic (usually 7 days for full cure)
- [ ]Surface sealed if recommended by manufacturer
Acceptance and Quality Check
Before signing off on your installation (whether DIY or professional), verify:
| Check Item | How to Verify | Acceptable Standard |
|---|---|---|
| Lippage | Run hand across tile edges | ≤1/16" offset between adjacent tiles |
| Hollow spots | Tap tiles with rubber mallet | Solid sound (no hollow echo) |
| Grout joint consistency | Visual inspection | Uniform width (±1/32") |
| Movement joints | Visual inspection | Present at all perimeters and specified locations |
| Mortar coverage | Occasionally pull a tile during install | 95%+ coverage, no voids >2 sq in |
| Cleanliness | Visual inspection | No haze, no mortar residue in joints |
Why Local Expertise Matters
Working with South Denver Tile Experts means your gauged porcelain installation accounts for regional factors that out-of-state contractors might miss: Colorado's unique soil conditions (expansive clay common in Highlands Ranch and Parker), altitude effects on material curing times, and the dramatic freeze-thaw cycles that can destroy improperly installed tile.
Our team sources materials from suppliers who understand Denver's climate, and we've developed relationships with structural engineers throughout the metro area for those projects requiring substrate reinforcement. Whether you're renovating a historic bungalow in central Denver or building new in Aurora's master-planned communities, we bring local knowledge that matters.
Frequently Asked Questions
Q1: Why is gauged porcelain tile installation more expensive than standard tile?
A: The cost difference reflects the precision work required. Your substrate must be prepared to far tighter tolerances (1/16" versus 1/4" for standard tile), specialized mortars are required, and installation takes longer due to the size and weight of large-format tiles. In the Denver area, expect to pay $14-25 per square foot for professional gauged porcelain installation versus $12-15 for standard tile—but the investment pays off in longevity and aesthetics.
Q2: Can I install gauged porcelain tile over my existing tile floor?
A: Sometimes, but conditions must be perfect. The existing tile must be completely bonded to the substrate (no hollow spots), the surface must meet flatness tolerances after any lippage is ground down, and the floor must handle the additional weight and thickness. Many older tile installations in Denver homes don't meet these criteria, making removal and fresh substrate preparation the safer choice.
Q3: Do I really need movement joints, or are manufacturers just being overly cautious?
A: Movement joints are absolutely critical, especially in Colorado. We've responded to numerous service calls where tiles "mysteriously" cracked or popped up—and nearly all involved missing or improperly placed movement joints. Denver's daily and seasonal temperature swings (50-degree shifts aren't uncommon) cause materials to expand and contract. Without joints, that energy has to go somewhere, and it typically results in cracked tile or debonding.
Q4: How long does mortar need to cure before I can use my new tile floor?
A: Mortar curing is a two-stage process. For foot traffic, most manufacturers specify 24-72 hours. However, full cure takes 7-14 days. This is particularly important in Denver's dry climate—you may need to mist the surface in the first few days to prevent too-rapid drying, which can weaken the bond. Don't place heavy furniture or rugs until the full cure period has elapsed.
Q5: What happens if my installer doesn't achieve 95% mortar coverage?
A: Voids under the tile create unsupported areas that are prone to cracking under load. Even worse, voids near the edges can allow moisture infiltration, which then freezes in winter (a real concern in Denver's climate) and causes delamination. Always verify mortar coverage during installation—a good installer will welcome your oversight and may even show you pulled tiles to demonstrate coverage.
Q6: Can gauged porcelain tile be used outdoors in Colorado?
A: Yes, but with important caveats. The tile itself must meet ASTM C1026 frost resistance standards (most gauged porcelain does). However, the installation assembly—substrate, mortar, and grout—must all be rated for freeze-thaw exposure. Outdoor installations require extra movement joints, proper drainage to prevent water pooling under the tile, and often a raised pedestal system rather than direct bonding. This is specialized work; consult with professionals experienced in Denver's climate before proceeding.
Q7: My contractor says my floor joists need reinforcement before tile installation. Is this really necessary?
A: If your floor doesn't meet the L/720 deflection standard, then yes, reinforcement is necessary. This is especially common in homes built in the 1980s-90s in Littleton and Aurora, which often have 2×10 joists on 16-inch centers—adequate for carpet or vinyl, but not for rigid tile. Skipping reinforcement may save money initially, but it virtually guarantees cracked tile within months. Proper reinforcement might include adding blocking between joists, sistering additional joists, or installing a second layer of subfloor.
Moving Forward With Your Project
Gauged porcelain tile can transform your space with its seamless, modern appearance—but success requires respecting the material's unique installation demands. Whether you're planning a kitchen remodel, bathroom renovation, or whole-home flooring project, understanding the critical interaction between substrate, materials, and installation method will help you make informed decisions.
For homeowners in Denver, Aurora, Parker, Littleton, and Highlands Ranch considering gauged porcelain tile: Start by having your substrate professionally evaluated. Many installation problems can be traced back to skipping this step. Then, work with your tile supplier and installer to confirm material compatibility before purchasing—returns or reorders can delay your project by weeks.
If you'd like to discuss your specific project and get a professional assessment of your substrate conditions, South Denver Tile Experts offers free consultations for gauged porcelain installations throughout the metro area. We'll walk through your space, explain what preparation will be needed, and provide transparent pricing so you can budget appropriately. Great tile installation is equal parts material, method, and experience—and we're here to ensure your project succeeds on all three counts.