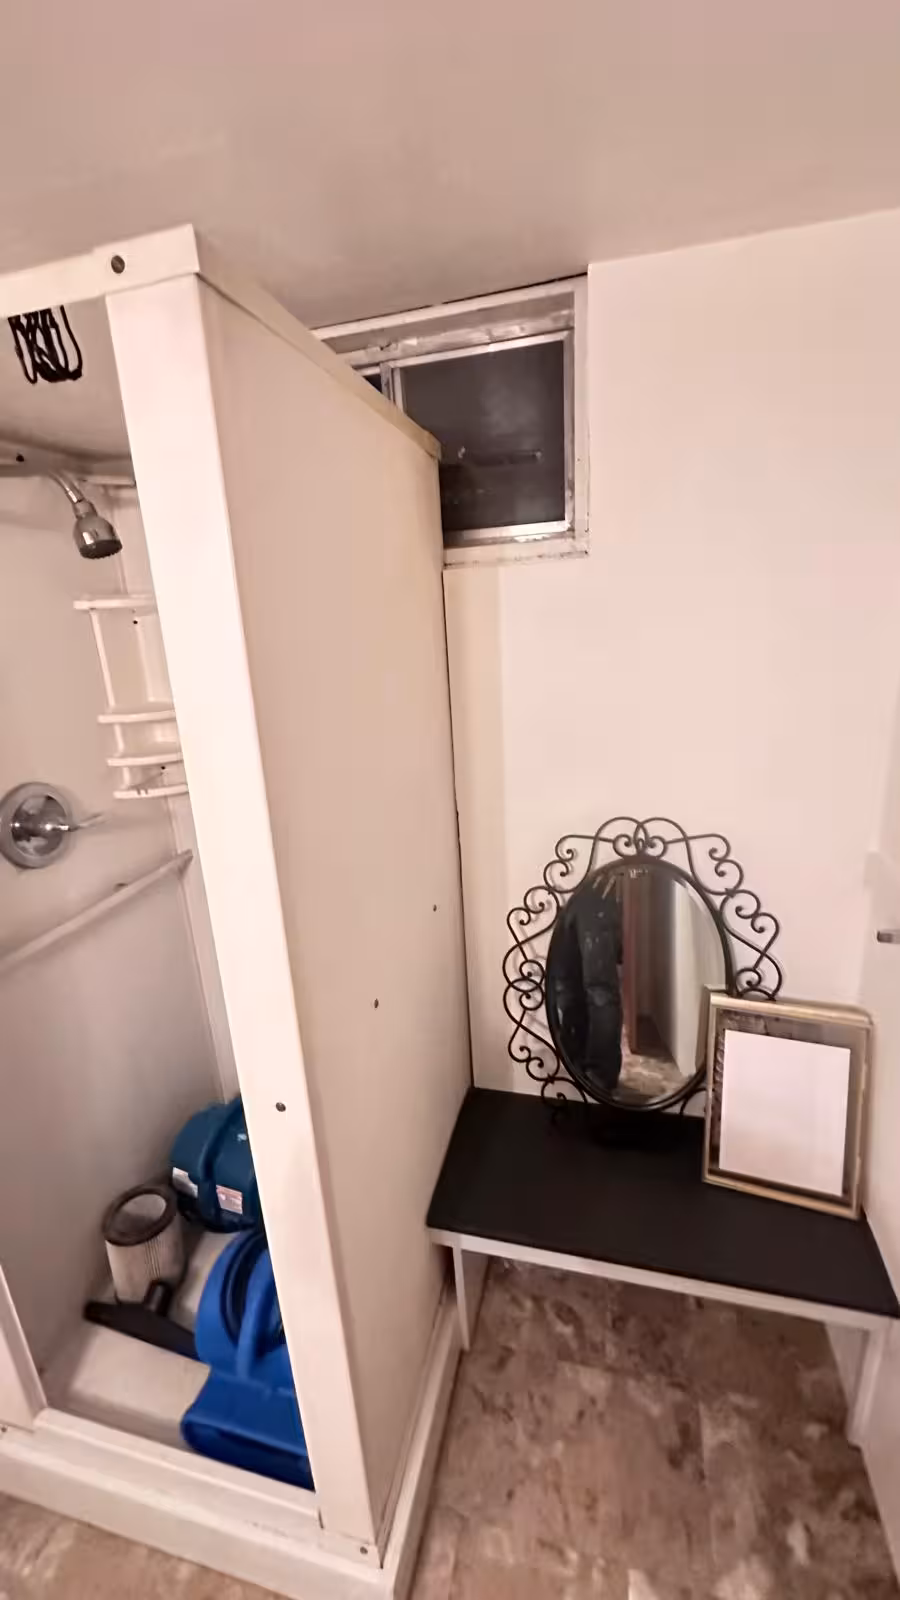
The Challenge: An Unused Basement Shower
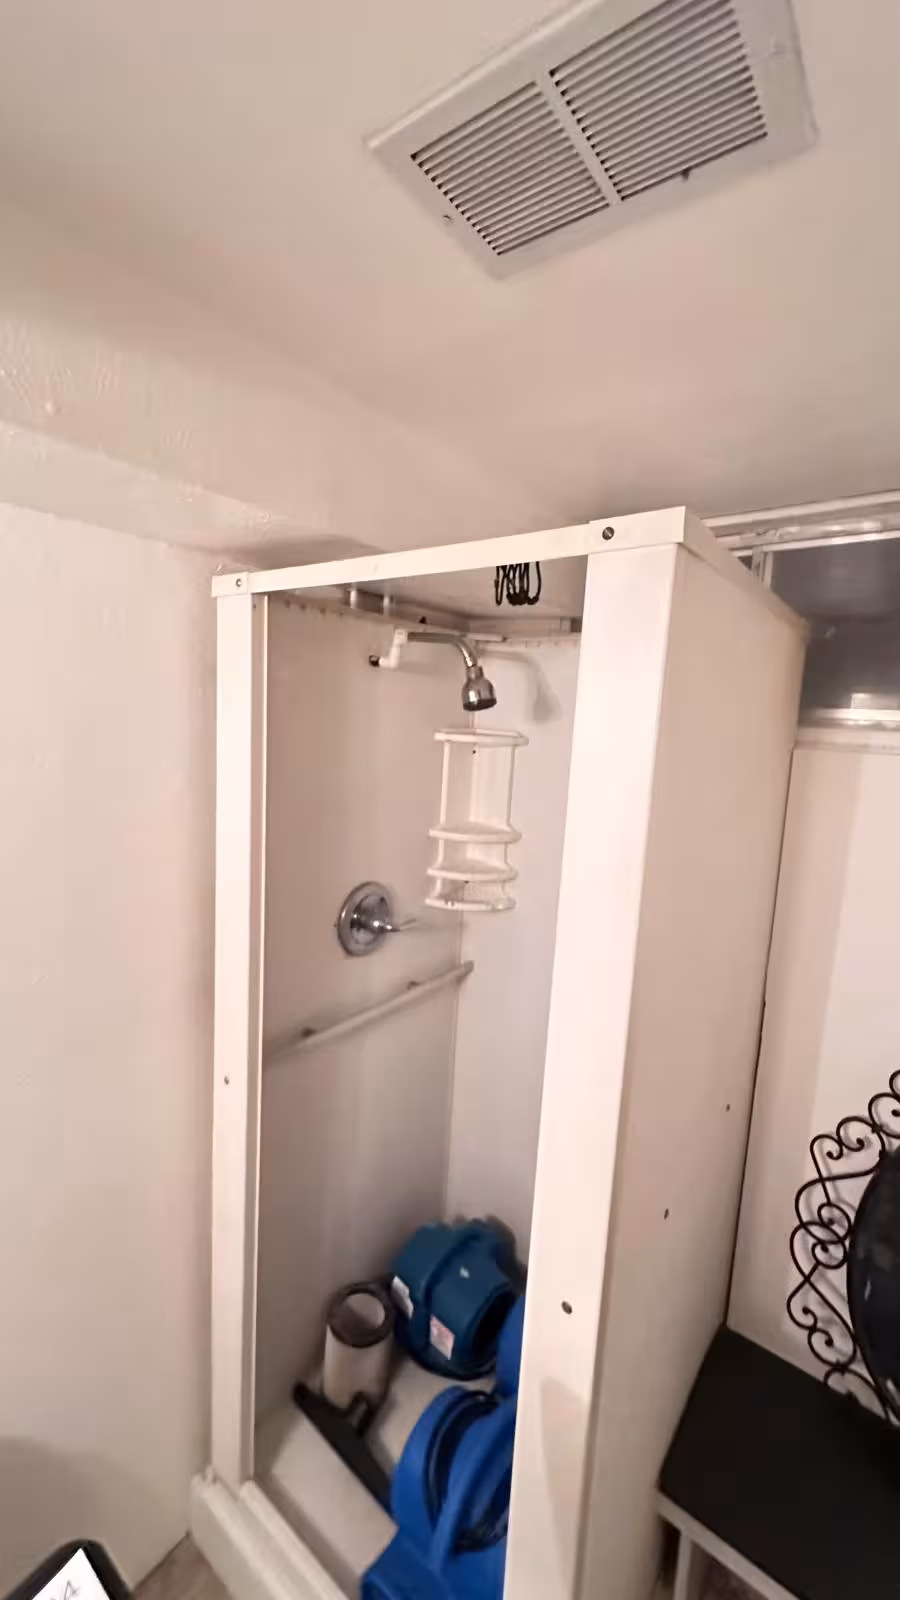
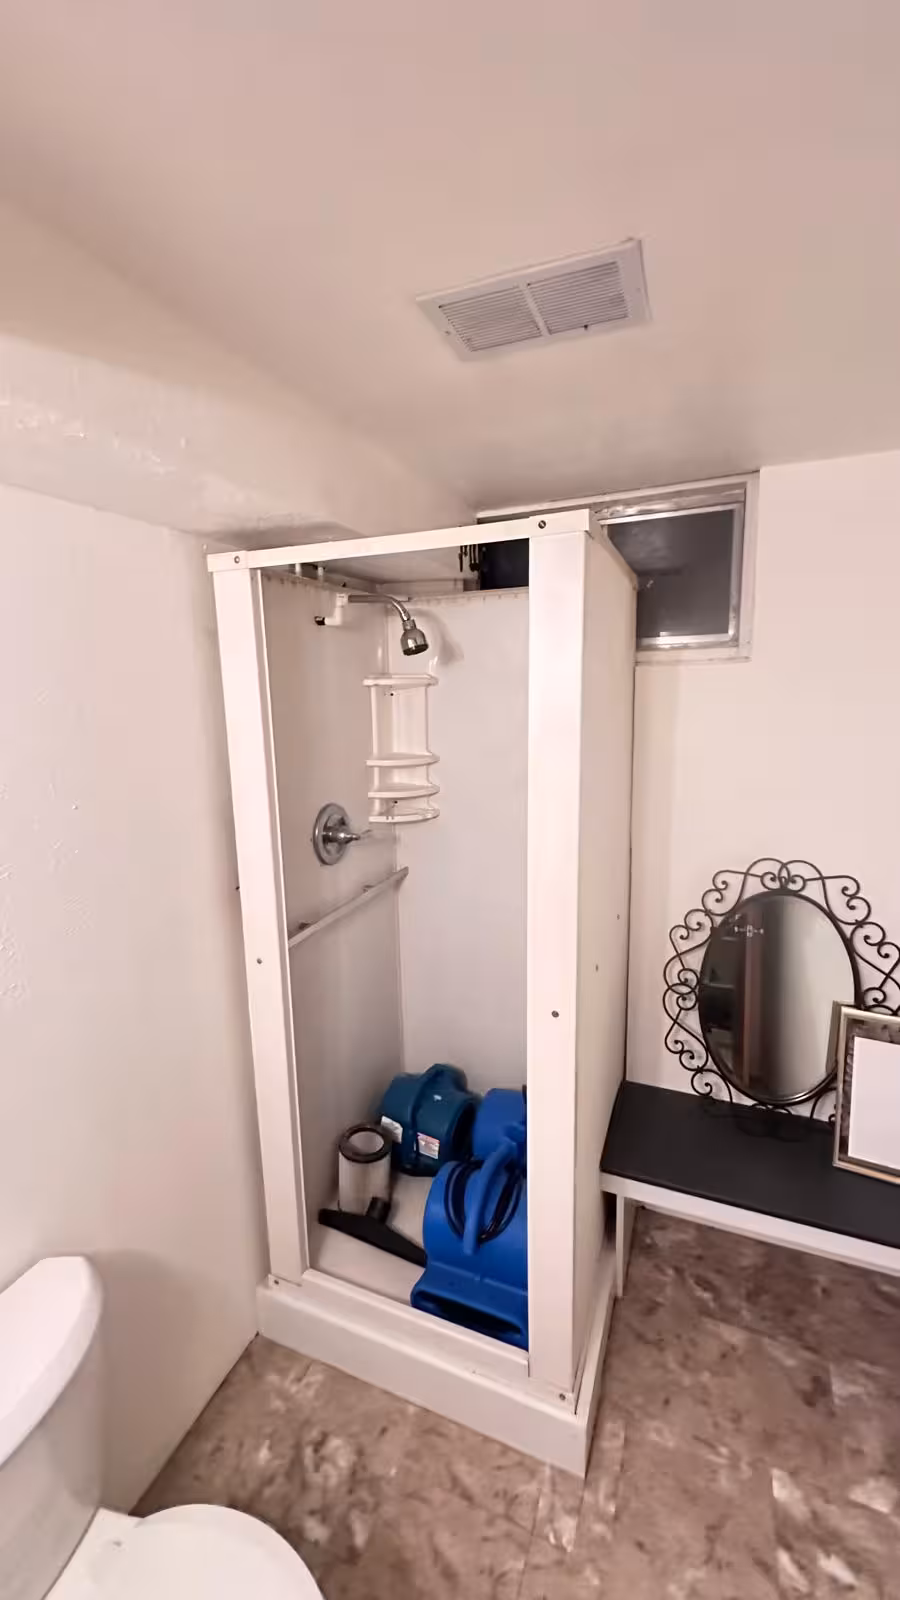
A young family in Littleton had recently completed a major home renovation and addition. While they'd updated most of their house, one space remained untouched: the basement bathroom. The existing shower was an old fiberglass stall that took up valuable space but was never used due to its outdated appearance and cramped feel.
Initial Conditions:
- Basement location with low ceiling
- Old fiberglass shower enclosure (non-functional, unused)
- Outdated bathroom fixtures
- Limited shower space
- Ceiling soffit reducing headroom
- Off-center drain placement
The family wanted to transform this neglected basement bathroom into a functional, beautiful space they would actually use—something that matched the quality of their recently renovated main living areas.
Before: Outdated Basement Bathroom
Old fiberglass shower stall that was never used, outdated fixtures, and wasted basement space

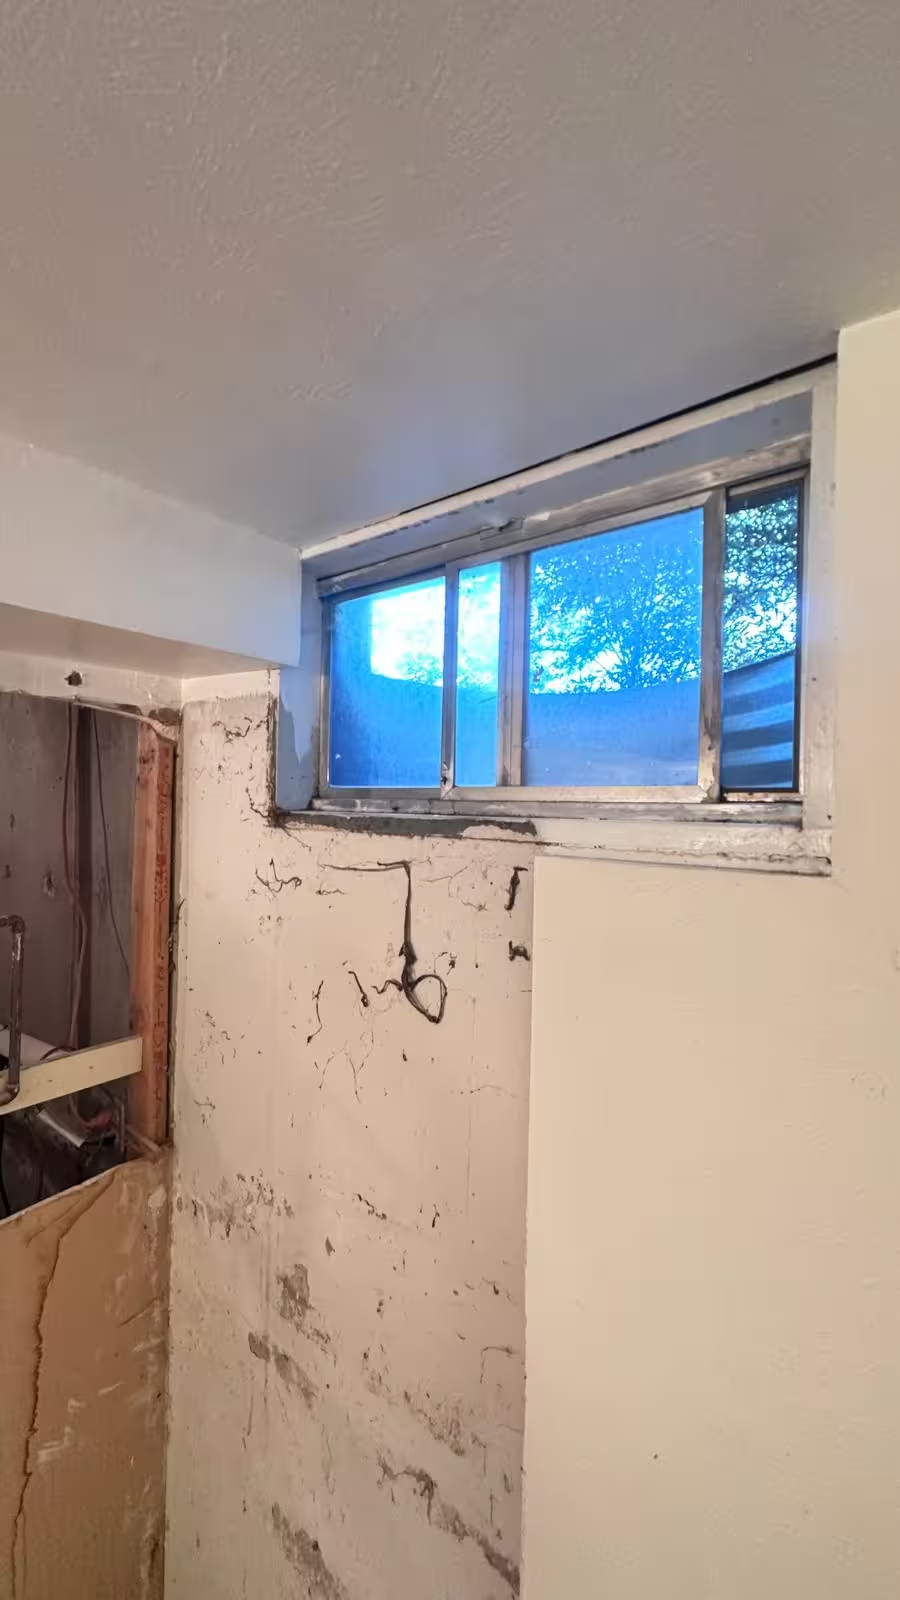
Discovery: Hidden Space in the Ceiling
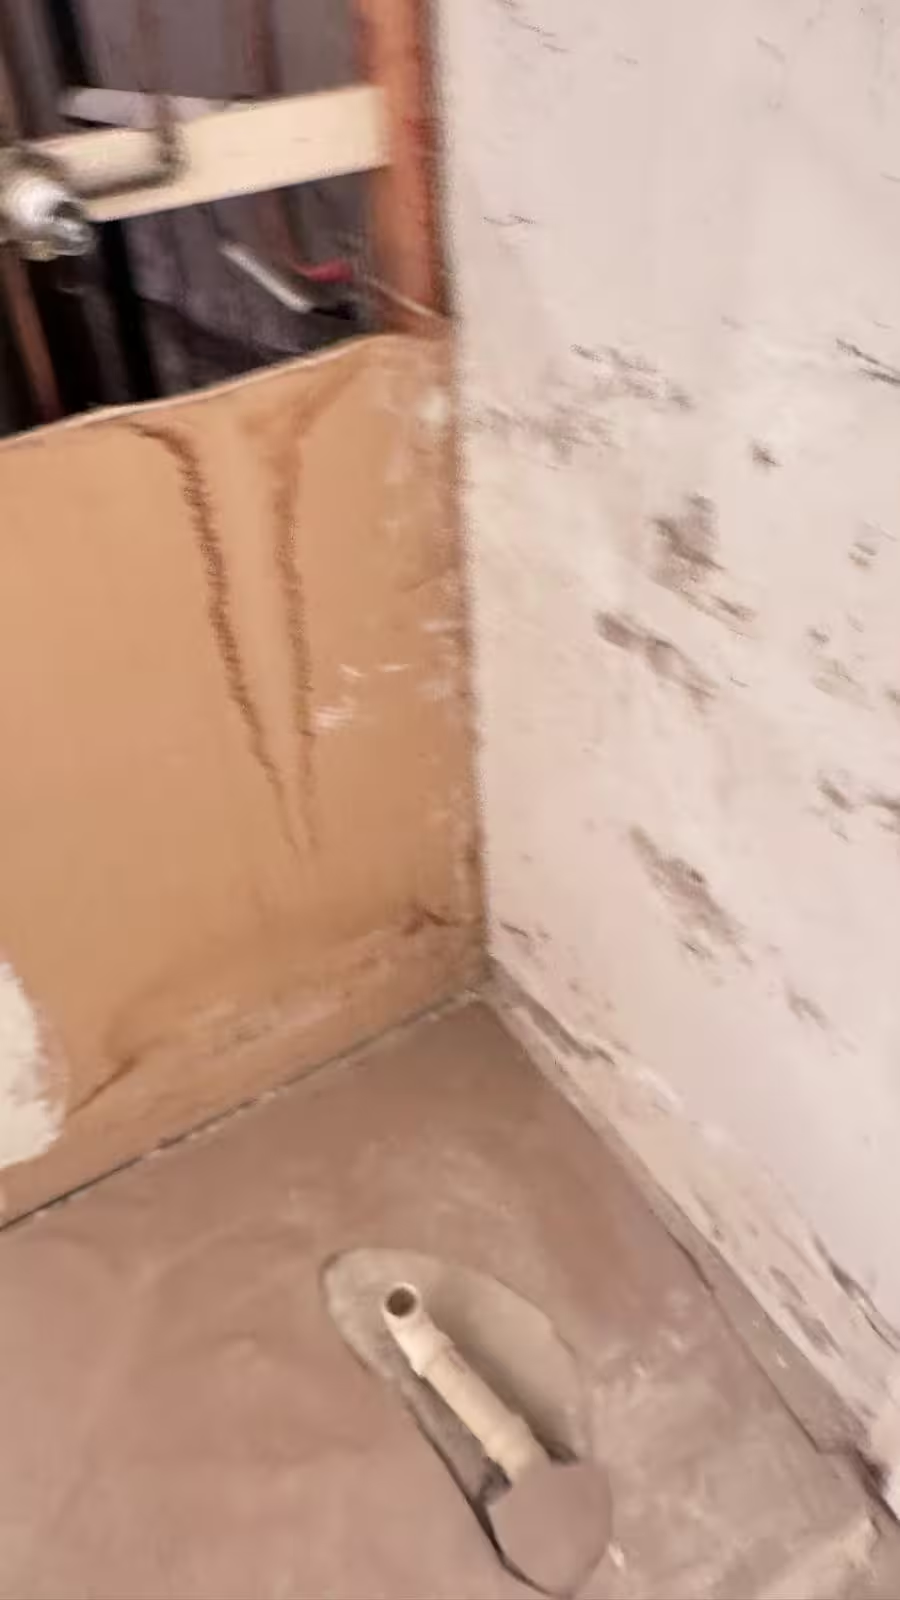
When we arrived for initial assessment, the homeowners had already completed demolition work, removing the old toilet and fiberglass shower stall. This gave us a clean slate to reimagine the space.
During our site evaluation, we noticed a ceiling soffit (bulkhead) that reduced the shower area's headroom. We proposed investigating whether this soffit could be removed to increase ceiling height and create a more spacious shower experience.
What We Found:
After carefully opening the soffit, we discovered it contained no essential elements:
- No plumbing lines
- No HVAC ducts
- No structural support members
- No electrical conduit
The soffit was purely decorative and served no functional purpose. This discovery allowed us to proceed with a significant space enhancement.
The Solution:
We removed the unnecessary soffit and raised the ceiling to its full height. This single modification transformed the shower area from a cramped, basement-feel space into an open, airy shower that didn't feel like an afterthought.
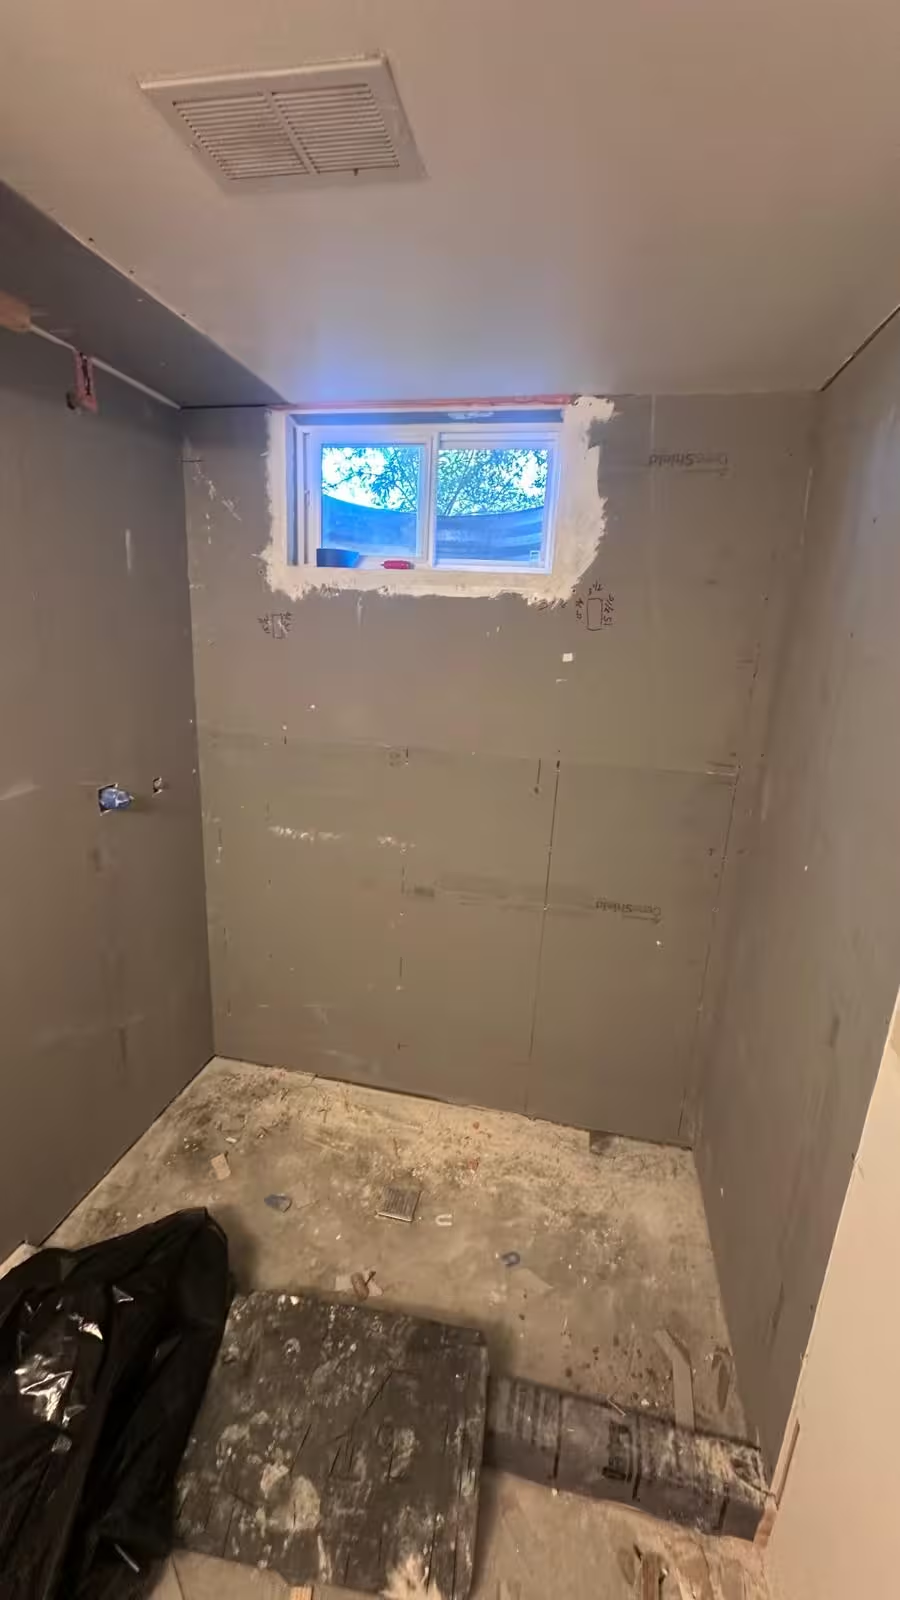
During: Professional Construction Process
Proper substrate preparation, waterproofing installation, and tile work following TCNA standards
Our Approach: Maximize Space, Unify Design
Plumbing Reconfiguration
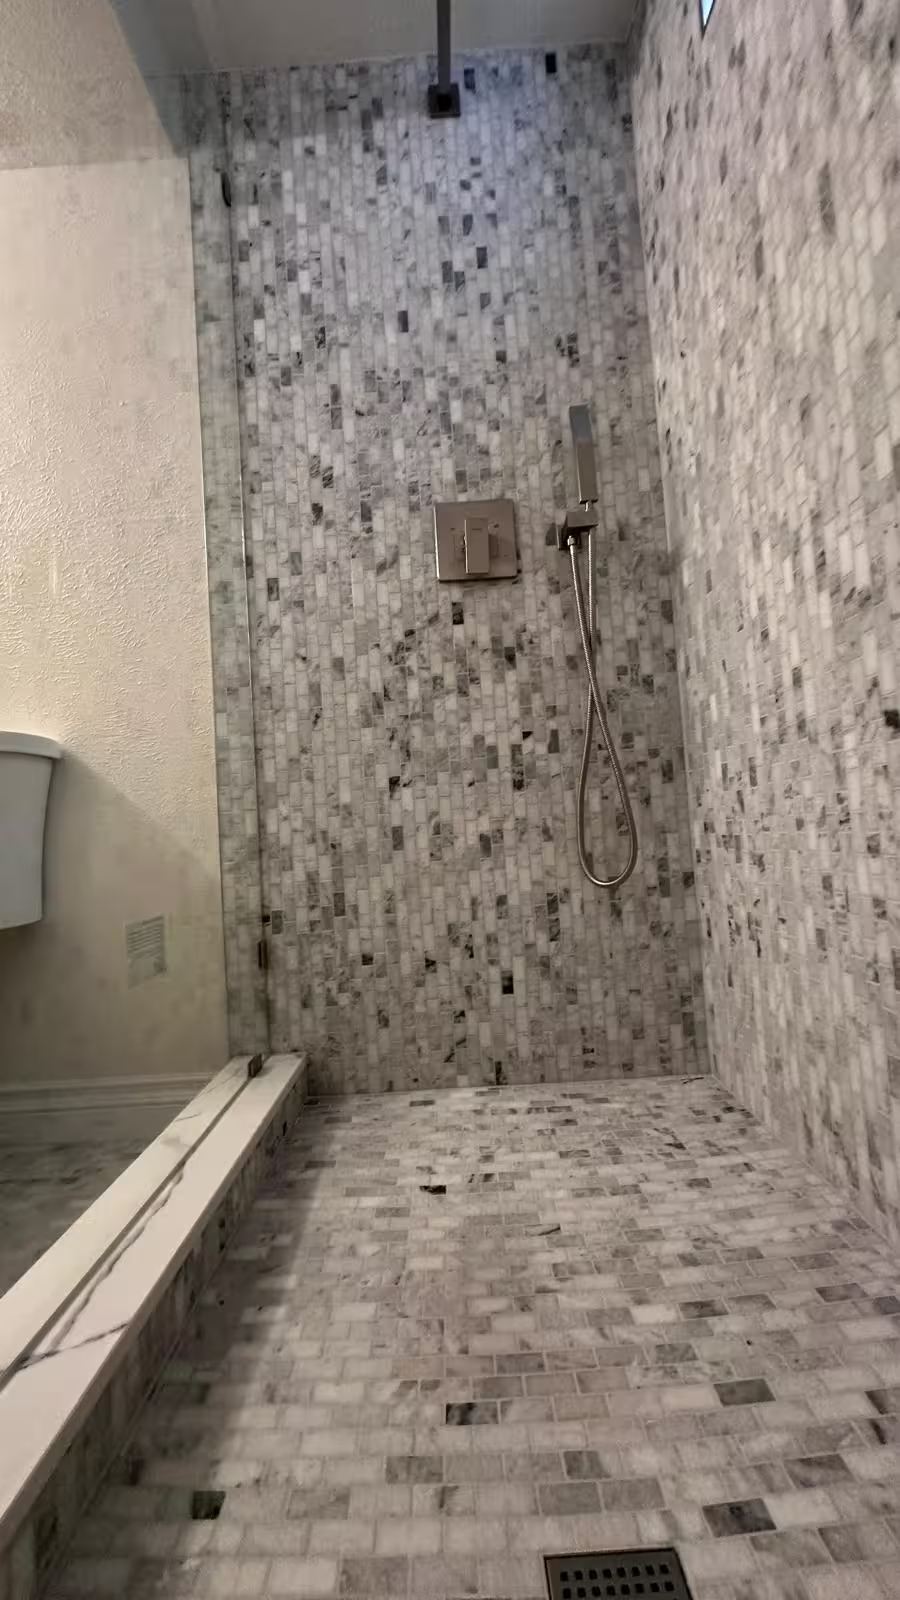
Drain Relocation:
The existing drain was positioned off-center, limiting design flexibility. We relocated the drain to the center of the new shower footprint, allowing for:
- Optimal water flow from all directions
- Better slope geometry for the shower pan (learn more about proper shower floor slope requirements)
- More flexible tile layout options
- Centered drain cover for aesthetic appeal
New Plumbing Installation:
Complete shower valve and supply line replacement to accommodate:
- Overhead rainfall showerhead
- Handheld shower spray
- Modern pressure-balancing valve
- Proper mixing for consistent temperature
Shower Pan Construction with Waterproof Liner
Following TCNA standards for basement shower installations, we built a traditional mortar bed shower pan with PVC waterproof liner.
Why This Matters in Basements:
Basement showers require extra attention to waterproofing since any leak can cause significant moisture issues in below-grade spaces with limited ventilation and potential drainage challenges.
Our Installation Process:
- Pre-Slope Mortar Bed: Created the foundational slope (1/4" per foot) from perimeter to the centered drain location
- PVC Waterproof Liner: 40 mil PVC membrane meeting ASTM D4551 standards, proper upturn (3" minimum above finished threshold), corner folds (no cuts) to prevent leak points, sealed to two-part clamping drain with 100% silicone
- Flood Test: Performed mandatory 24-hour flood test to verify waterproofing integrity before proceeding with finish work
- Final Mortar Bed: Dry-pack mortar over verified waterproof liner, minimum 1.5" thickness at drain, proper slope maintained throughout, smooth troweled finish for tile installation
Wall Waterproofing and Preparation
Waterproofing System:
All shower walls received comprehensive waterproofing treatment:
- Cement board substrate installation
- Liquid or sheet waterproofing membrane applied to all surfaces
- Seams and corners reinforced per manufacturer specifications
- Complete waterproof envelope from floor to ceiling
Why Complete Wall Waterproofing:
In basement installations, preventing moisture intrusion into wall cavities is critical. We waterproofed the entire shower enclosure—not just the pan—to create a fully sealed system.
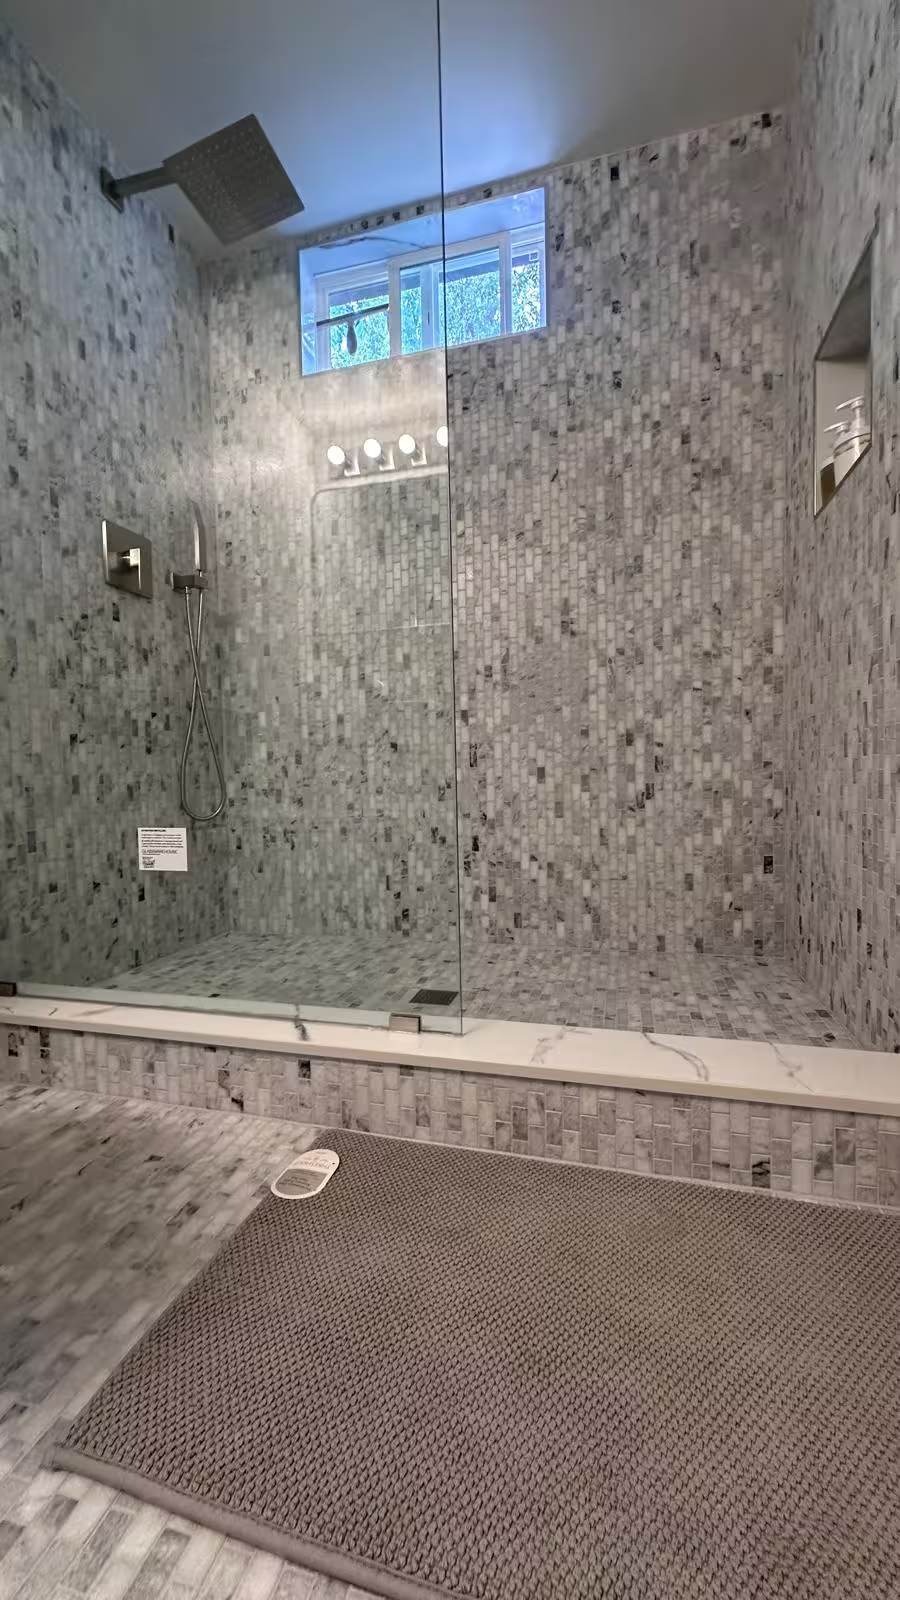
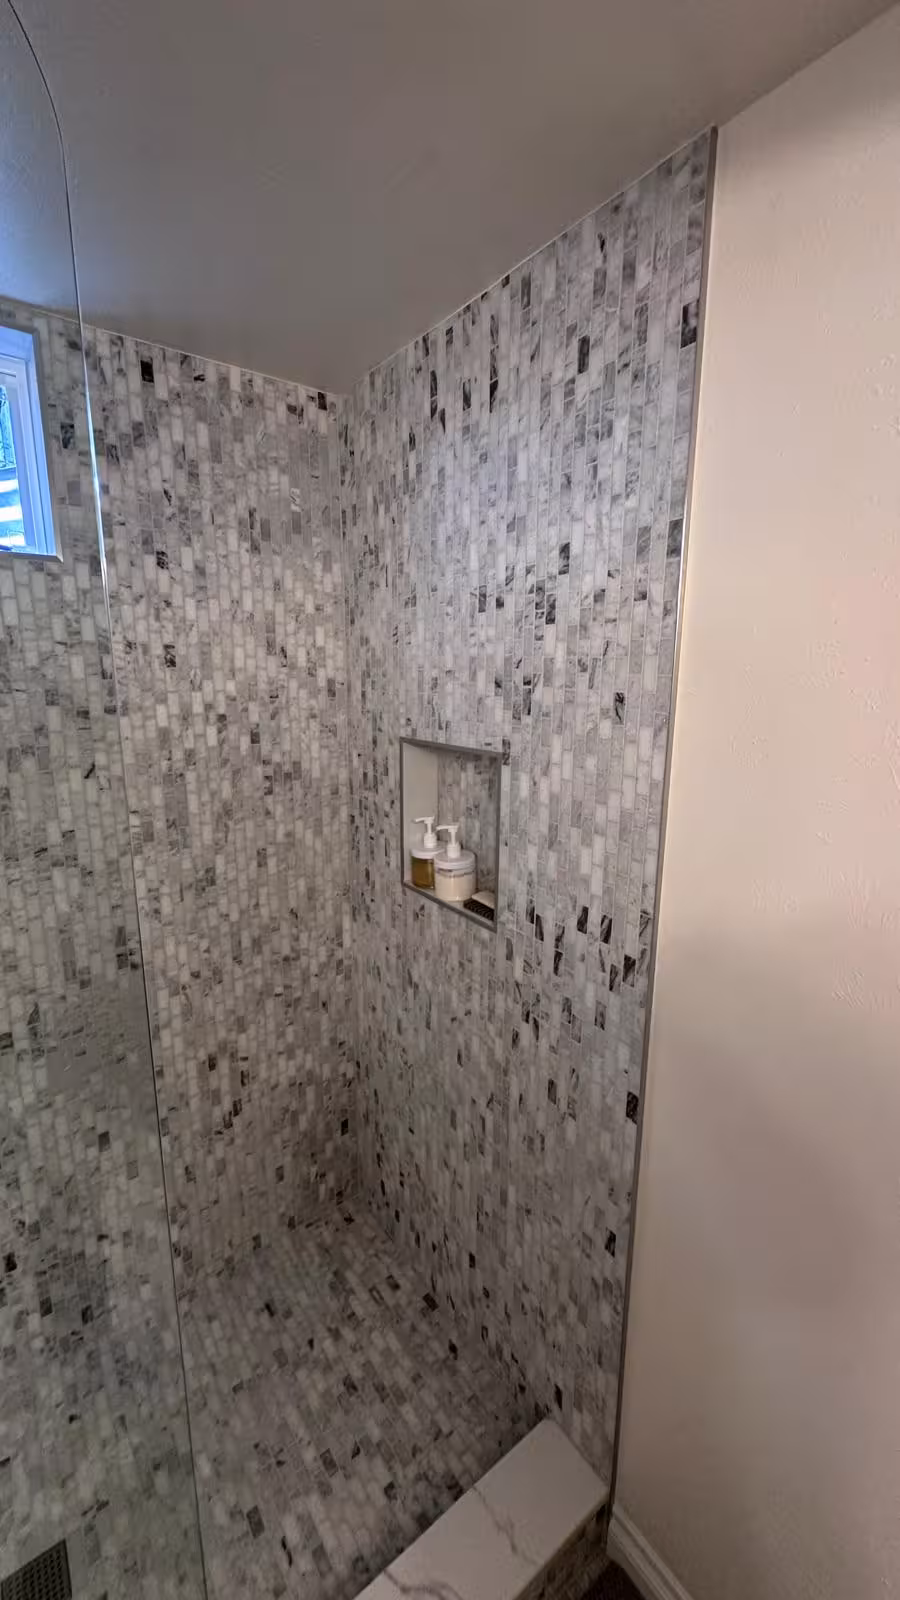
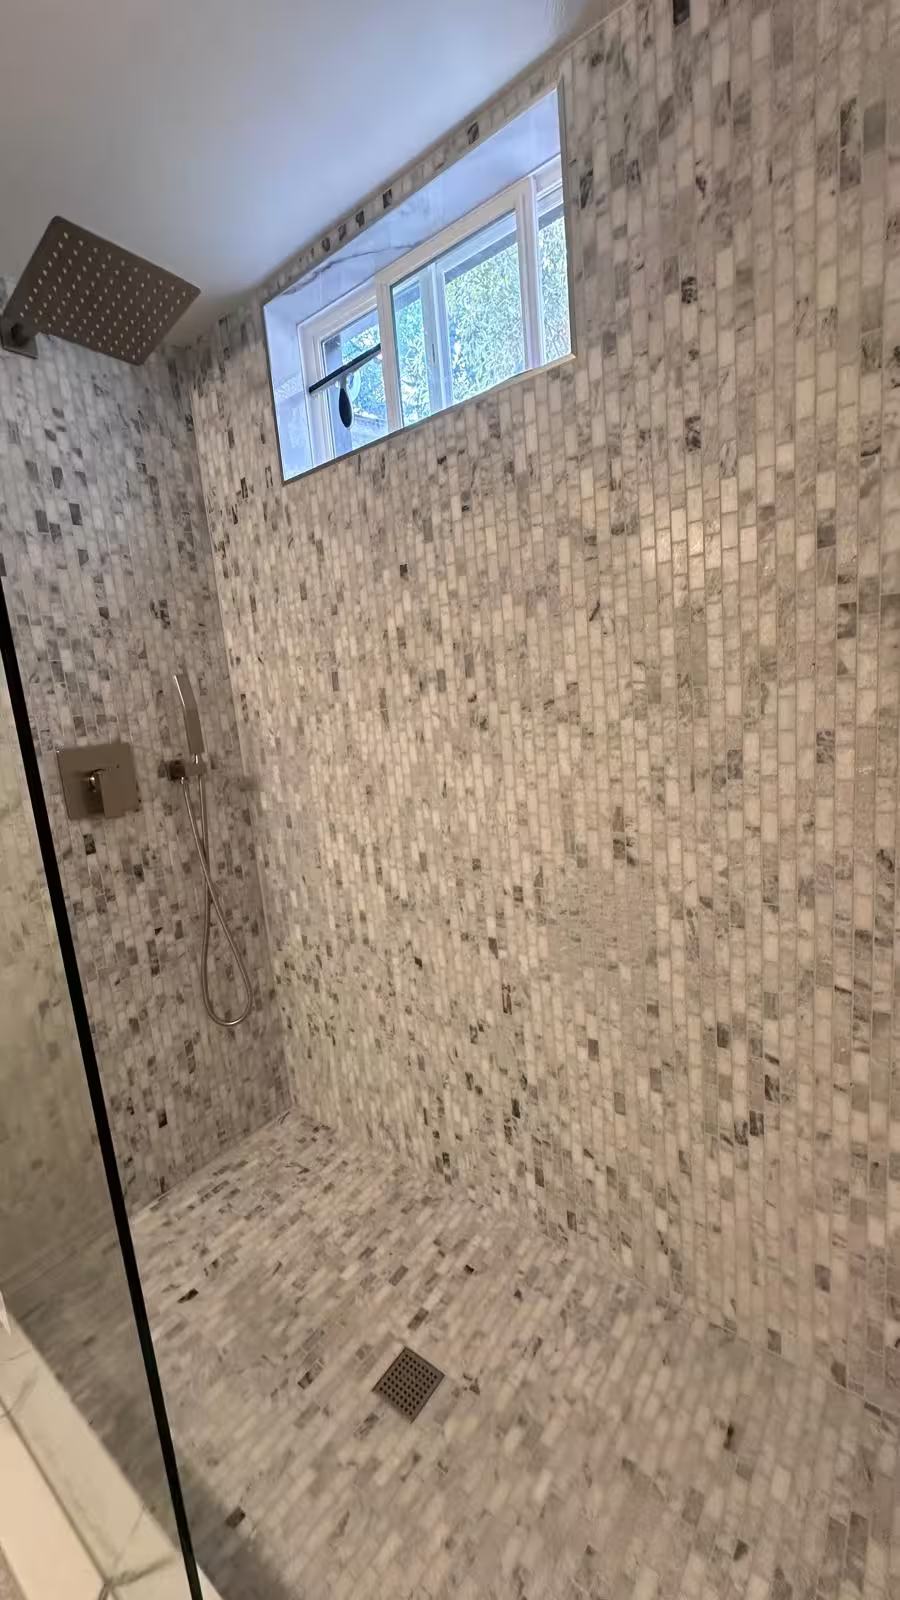
Marble Tile Installation - Cohesive Design
The homeowners made an excellent design decision: use the same marble tile throughout the entire bathroom for a cohesive, luxury appearance.
Unified Material Selection:
- Shower Walls: Marble mosaic tile
- Shower Floor: Marble mosaic tile
- Bathroom Floor: Matching marble tile
- Built-in Niche: Marble mosaic accent
This single-material approach created visual continuity and made the basement bathroom feel like an intentional luxury space rather than an afterthought basement conversion.
Installation Details:
- Modified thin-set mortar for natural stone
- Precise layout to maintain pattern consistency
- Professional cuts around fixtures
- Epoxy grout for stain resistance and waterproofing
- Professional sealing of all marble surfaces
Built-In Features
Custom Soap Niche:
A recessed niche was built into the shower wall, tiled with matching marble mosaic to provide:
- Convenient storage for shower products
- Integrated design element (not an afterthought add-on)
- Water-resistant storage that won't rust or deteriorate
- Professional finish with proper waterproofing at all edges
Tiled Shower Bench:
A built-in bench was constructed along one wall, fully tiled with marble mosaic:
- Comfortable seating for shaving or relaxation
- Accessible design feature (compliant with ADA guidelines)
- Additional storage surface
- Properly sloped top to prevent water pooling
- Integrated appearance matching wall tile
Fixtures and Finishing
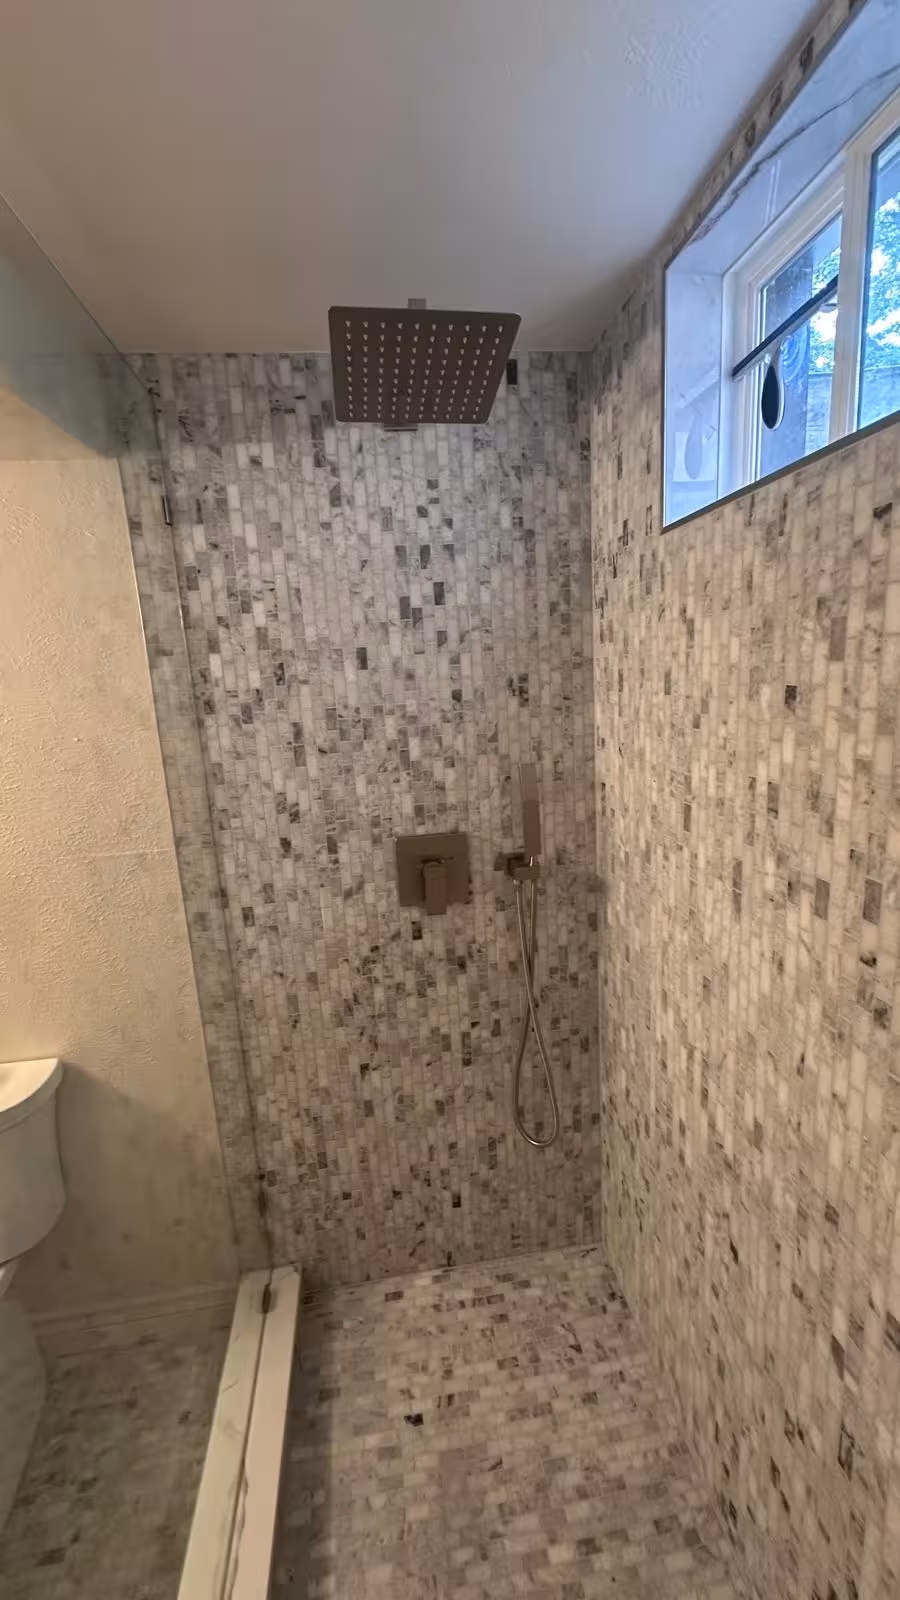
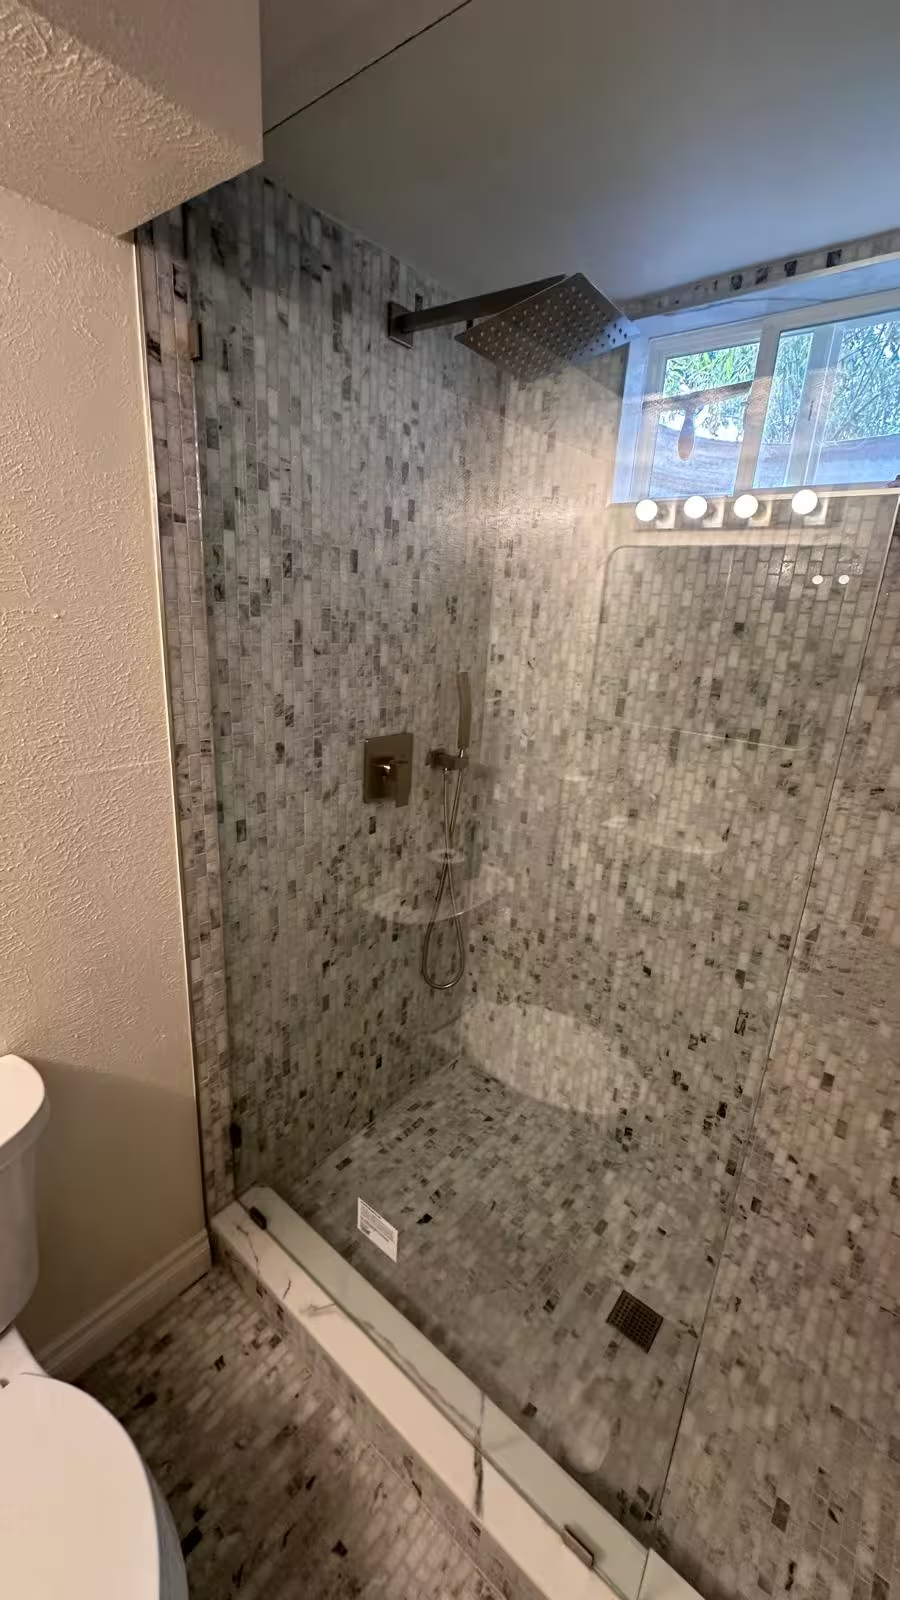
Overhead Rainfall Showerhead:
Ceiling-mounted rainfall head provides spa-like experience:
- Wide coverage pattern
- Luxurious water flow
- Optimal height thanks to raised ceiling
Handheld Shower Spray:
Wall-mounted handheld unit offers:
- Flexibility for different users
- Easy cleaning of shower surfaces
- Chrome finish matching other fixtures
Frameless Sliding Glass Door:
Custom glass enclosure:
- Clear glass maximizes visual space
- Sliding mechanism saves floor space
- Minimal hardware for clean appearance
New Compact Toilet & Vanity:
Space-efficient selections:
- Modern low-flow efficiency
- Compact footprint maximizes shower area
- Contemporary styling
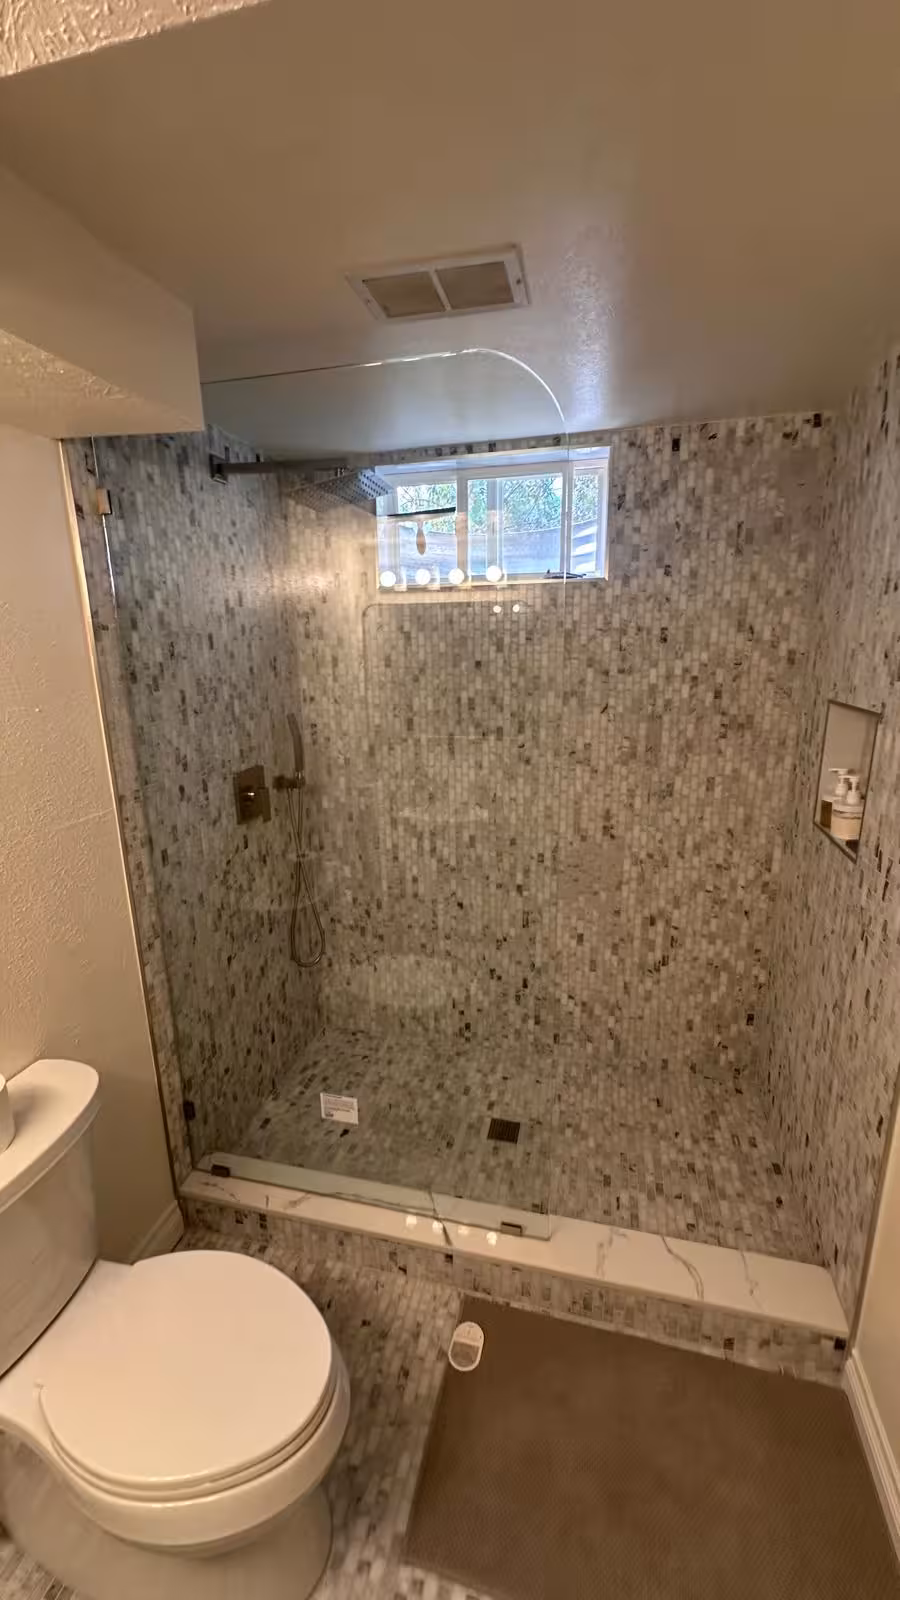
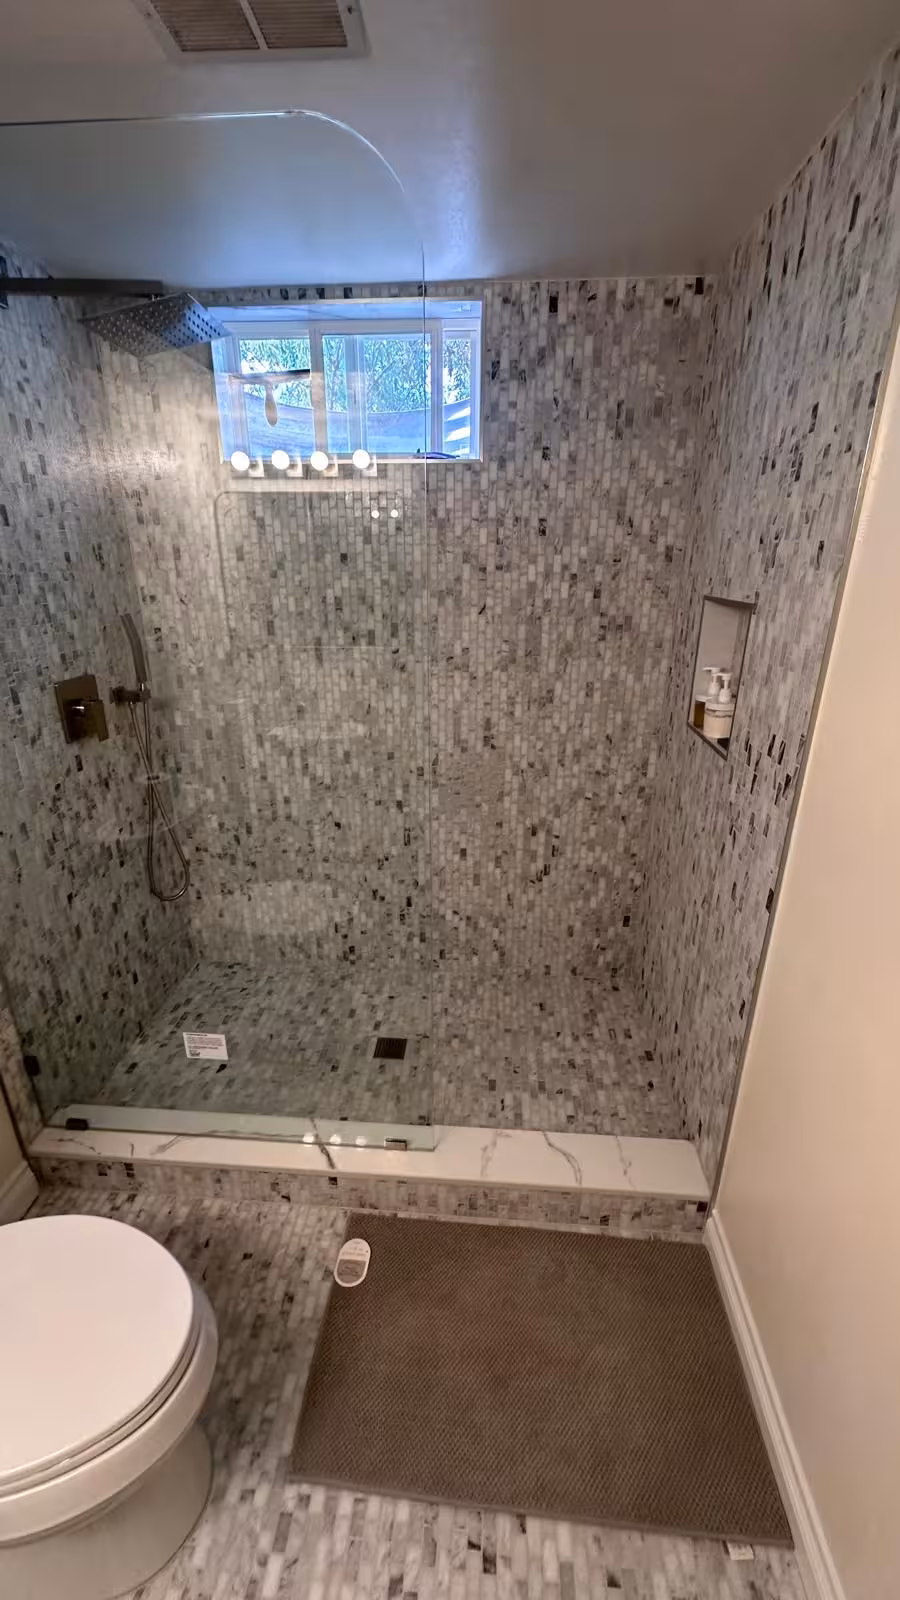
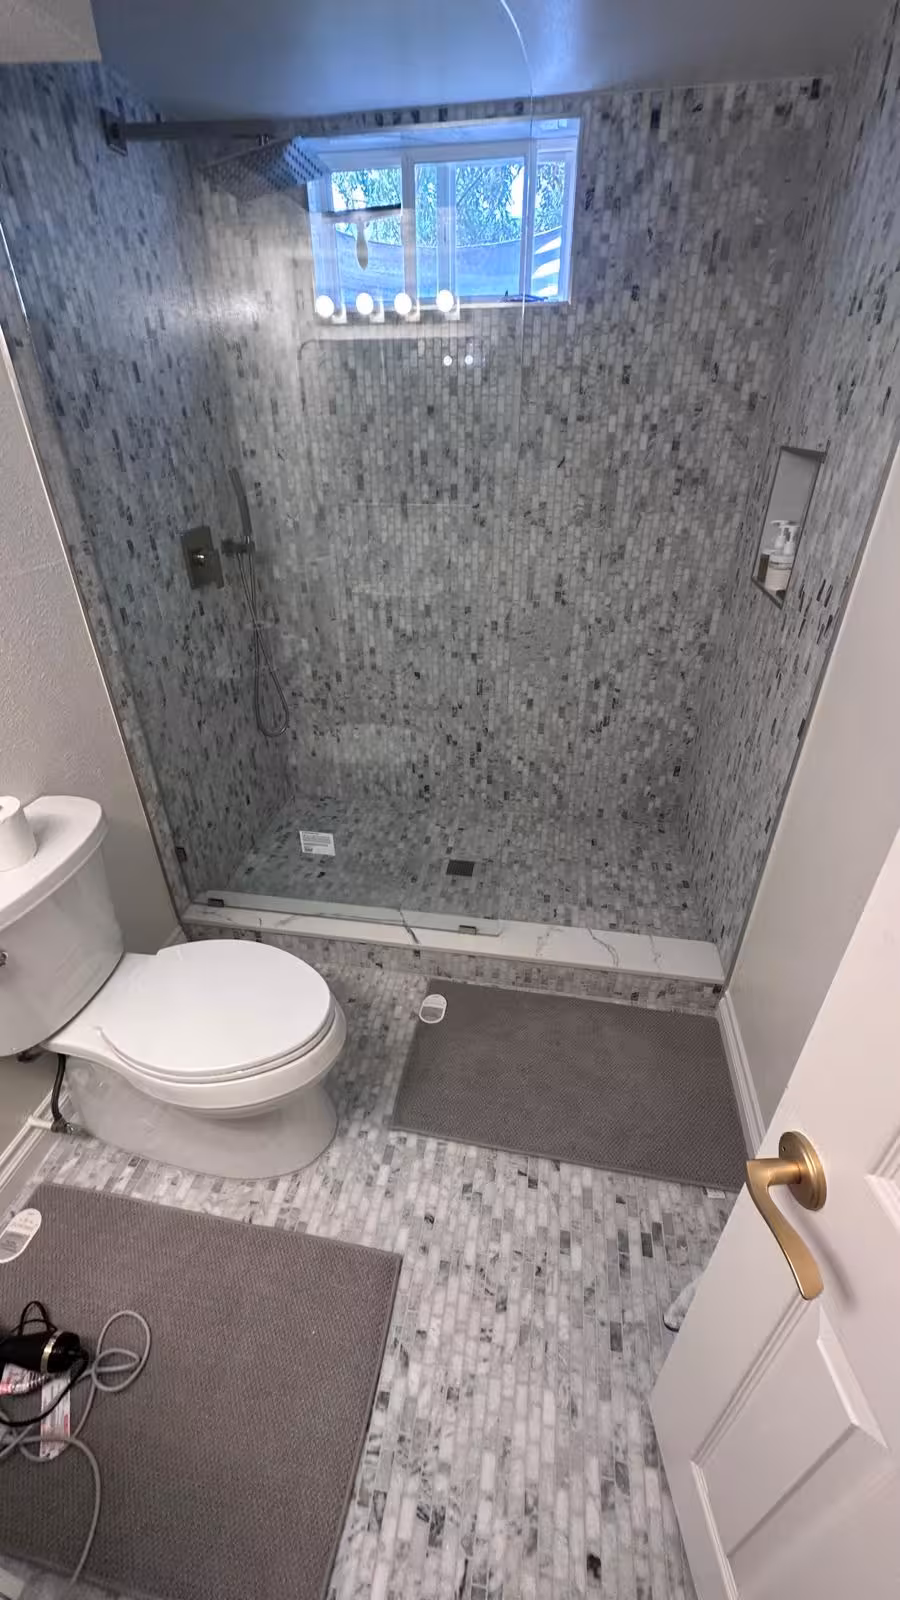
After: Luxury Marble Walk-In Shower
Complete transformation to spacious, spa-like basement bathroom with raised ceiling, marble mosaic tile, and premium fixtures


Space Planning Success
The strategic decisions made during this renovation significantly increased the functional shower space:
What Created More Room:
- Ceiling soffit removal - Added vertical space and open feel
- Compact toilet selection - Freed up floor space for larger shower footprint
- Centered drain placement - Optimized shower pan geometry
- Frameless sliding door - Minimized visual and physical barriers
- Built-in storage - Eliminated need for floor-standing caddies
The result: A basement shower that feels spacious and luxurious rather than cramped and utilitarian.
Materials & Finishes
Results: Basement Bathroom Transformation
The unused, outdated basement shower became a beautiful, functional space the family now uses regularly.
Functional Benefits
- Usable basement bathroom (previously avoided)
- Spacious walk-in shower with headroom
- Built-in seating and storage
- Modern plumbing with reliable temperature control
- Proper waterproofing preventing future moisture issues
Long-Term Value
- Increased home value with updated basement bathroom
- Durable materials requiring minimal maintenance
- Proper waterproofing preventing expensive repairs
- Timeless design that won't feel dated
- True renovation success story at $5,893 investment
Interested in transforming your basement bathroom? Explore our complete bathroom renovation services, or see more of our work in our project portfolio.
Basement Shower Remodel FAQ
Can you remodel a basement shower without major structural changes?
Yes, in most cases basement shower remodels don't require major structural work. This Littleton project shows how investigating existing structures (like ceiling soffits or bulkheads) can reveal opportunities for expansion without major structural modifications. In this case, we discovered the ceiling soffit contained no plumbing, HVAC, electrical, or structural elements—it was purely decorative and could be safely removed to increase ceiling height and create a more spacious shower experience. However, always have a licensed professional assess what can be safely modified. Some soffits do contain essential systems and cannot be removed. Our experience with basement renovations throughout Littleton and the Denver metro area helps us identify these opportunities during initial site evaluation. We also frequently relocate drains when the existing placement limits design flexibility, as we did in this project to center the drain for optimal water flow and aesthetic appeal.
Is marble tile a good choice for basement showers?
Absolutely. Natural marble provides a luxury appearance and, when properly sealed and maintained, performs excellently in basement environments. The key to long-term success with marble in basements is professional installation with comprehensive waterproofing systems (both shower pan liner and full wall membranes) and regular maintenance. Marble should be sealed with a penetrating sealer every 1-2 years to prevent staining and moisture absorption. In this Littleton project, we used marble mosaic tile throughout the entire bathroom—shower walls, shower floor, and bathroom floor—creating beautiful visual continuity. The small-format mosaic provides excellent slip resistance on the shower floor, which is critical for safety. Marble's timeless aesthetic won't feel dated in 10-20 years, unlike trendy materials. For basement installations specifically, ensure your contractor follows TCNA (Tile Council of North America) standards for waterproofing, as basement moisture issues are more difficult to remedy than main-floor problems. When installed correctly with proper substrate preparation, waterproofing, and sealing, marble is an excellent basement shower material.
Do basement showers need special waterproofing?
Yes, basement showers absolutely require comprehensive waterproofing—both shower pan liner systems and full wall waterproofing membranes. Below-grade moisture issues are significantly more difficult and expensive to remedy than main-floor problems because basements have limited ventilation, potential groundwater pressure, and moisture can quickly spread to adjacent spaces. In this Littleton basement shower, we followed TCNA standards for below-grade installations: (1) Traditional mortar bed shower pan with 40 mil PVC liner meeting ASTM D4551 standards, (2) Pre-slope layer to direct water to drain before it reaches the waterproof liner, (3) Proper liner upturn (minimum 3 inches above threshold), (4) Two-part clamping drain with silicone seal, (5) Mandatory 24-hour flood test before tile installation, (6) Complete wall waterproofing membrane on all shower enclosure surfaces, (7) Waterproof seams and corners reinforced per manufacturer specifications. This creates a fully sealed envelope preventing moisture intrusion into wall cavities and subfloor. Many basement shower failures occur because installers skip these critical waterproofing steps or use inadequate materials. Never allow a contractor to install basement shower tile directly over cement board without waterproofing membranes—this violates building codes and will lead to expensive moisture problems.
How much does a basement shower remodel cost?
This complete Littleton basement shower transformation cost $5,893, which included homeowner-completed demolition assistance, drain relocation and plumbing updates, ceiling soffit removal and modification, complete waterproofing systems (shower pan liner and wall membranes), marble mosaic tile throughout bathroom, frameless sliding glass door, rainfall showerhead and handheld spray, modern fixtures, compact toilet, and professional installation. Basement shower remodel costs vary significantly based on several factors: shower size and footprint (larger showers require more materials and labor), tile material selection (marble, porcelain, natural stone, or premium mosaics), extent of plumbing work required (simple fixture replacement vs. complete drain relocation), structural modifications needed (ceiling changes, wall removal, layout alterations), glass enclosure type (frameless vs. framed, sliding vs. hinged), fixture quality (builder-grade vs. premium brands), waterproofing complexity (standard vs. challenging below-grade conditions), and permit and inspection requirements. For context, basic basement shower retiling with minimal plumbing changes might cost $3,500-$5,000, while extensive basement bathroom renovations with layout changes, premium materials, and custom features can reach $8,000-$15,000+. The $5,893 investment in this project delivered a complete transformation from unused, outdated fiberglass stall to a luxury marble walk-in shower the family uses daily.
Can you replace a fiberglass shower with tile?
Yes, replacing a fiberglass shower unit with custom tile is one of the most popular and impactful bathroom upgrades homeowners make. This transformation provides unlimited design flexibility, significantly better durability, easier cleaning and maintenance, and dramatically improved aesthetics. In this Littleton basement project, we removed an old fiberglass stall that was never used due to its cramped, dated appearance and replaced it with a spacious marble-tiled walk-in shower that became a beautiful, functional space the family enjoys daily. The process involves: (1) Complete removal of fiberglass unit and any damaged surrounding materials, (2) Assessment and repair of wall framing and subfloor, (3) Plumbing evaluation and updates (often drain relocation for better layout), (4) Installation of proper shower pan waterproofing system (we use traditional mortar bed with PVC liner for basements), (5) Wall substrate preparation with cement board, (6) Complete waterproofing of all shower surfaces, (7) Custom tile installation in your choice of materials, patterns, and colors, (8) Built-in features like niches, benches, or shelving, (9) Premium fixtures and glass enclosures. The critical difference between fiberglass and tile: proper waterproofing during installation. Fiberglass units are inherently waterproof; tile showers require professional waterproofing systems behind the tile. When done correctly following TCNA standards, tile showers last 30-50+ years compared to 20-25 years for fiberglass, and they add significantly more value to your home.
How long does a basement shower remodel take?
This complete Littleton basement transformation took 2 weeks from start to finish, including demolition assistance, ceiling modification, drain relocation, waterproofing installation, tile work, glass enclosure, and fixtures. Timeline depends on project scope and complexity. Simple basement shower retiling with no plumbing changes typically requires 1 week: (1) Day 1: Demolition and preparation, (2) Days 2-3: Shower pan construction and waterproofing, (3) Day 4: Flood testing (24 hours), (4) Days 5-6: Tile installation, (5) Day 7: Grouting, sealing, and finishing. More extensive projects involving plumbing relocation, structural modifications, or layout changes may require 2-3 weeks: (1) Week 1: Demolition, structural modifications (like soffit removal), plumbing rough-in, drain relocation, shower pan construction, flood testing, (2) Week 2: Wall waterproofing, tile installation (walls and floor), built-in features, (3) Week 3: Grouting, glass installation, fixture installation, final touches. Factors affecting timeline include: drying time for mortar beds (cannot be rushed), 24-hour flood test (mandatory but often skipped by rushed contractors), tile material (natural stone requires more careful installation than porcelain), built-in features (niches, benches add time), glass enclosure (custom sizing requires measurement after tile completion), and permit inspections (required in many jurisdictions). Professional contractors schedule projects efficiently while respecting necessary curing and testing periods. Beware of contractors promising unrealistic timelines—proper basement waterproofing cannot be rushed without risking future failures.
Should I use the same tile throughout my bathroom?
Using cohesive materials throughout your bathroom, as we did in this Littleton project with marble mosaic tile on shower walls, shower floor, and bathroom floor, creates visual continuity and makes spaces feel larger, more intentional, and more luxurious. This single-material approach eliminates visual clutter from multiple tile transitions and creates a seamless, spa-like aesthetic. However, you can also successfully combine complementary materials—the key is maintaining a unified color palette, style consistency, and intentional design decisions. Popular combination approaches include: using the same tile in different formats (large format on walls, mosaic on floor), selecting tiles from the same collection with coordinating colors and patterns, combining materials with similar tones (gray marble with gray porcelain), or using accent tiles sparingly (decorative band, niche backing, feature wall). The mistake to avoid: using random leftover materials or multiple unrelated tile styles creating a disjointed, dated appearance. In basement bathrooms specifically, cohesive material selection is particularly impactful because basements often feel like afterthought spaces. Treating the basement bathroom with the same material quality and design intention as main-floor bathrooms elevates the entire lower level. The marble mosaic used throughout this Littleton basement created a high-end appearance that matched the homeowners' recently renovated main living areas, making the basement feel like intentional, valuable living space rather than utilitarian storage.
What's better for a basement shower: pan liner or pre-fab base?
For basement showers, traditional mortar bed with waterproof liner (as used in this Littleton project) offers several significant advantages over pre-fabricated bases: (1) Custom sizing for any footprint—not limited to standard dimensions, allowing you to maximize space or work with unusual layouts; (2) Ability to create optimal slope for drainage—critical in basements where gravity drainage may be challenging; (3) Proven longevity when properly installed—30-50+ years compared to 15-25 years for foam bases; (4) Flexibility for design elements like custom benches, curbs, or multiple drains; (5) Superior waterproofing in below-grade applications—the PVC liner creates a secondary waterproof barrier; (6) Ability to relocate drains during installation—as we did in this project to center the drain for better aesthetics and function. Pre-fabricated bases (foam, fiberglass, or acrylic) work well for standard-sized main-floor showers with existing drain locations, but they have limitations: fixed sizes often don't optimize space, limited slope adjustment for proper drainage, cannot accommodate drain relocation without extensive subfloor work, difficult to integrate built-in seating or custom features, and shorter lifespan especially in basement moisture conditions. Following TCNA Handbook method B415, we construct traditional mortar bed shower pans using: pre-slope mortar bed (directs water to drain), 40 mil PVC membrane (ASTM D4551), two-part clamping drain with silicone seal, and top mortar bed (tile substrate). This time-tested method ensures reliable, long-lasting waterproofing in the challenging basement environment. The additional installation time (2-3 days vs. 1 day for pre-fab) is worthwhile for permanent, custom-fit results.
Do I need a building permit for a basement shower remodel?
Most jurisdictions, including Littleton and surrounding Denver metro communities, require building permits for plumbing work, waterproofing modifications, and structural changes (like the ceiling soffit removal in this project). Permit requirements typically include: plumbing permits for any drain relocation, fixture replacement, or supply line modifications; building permits for structural alterations (wall removal, ceiling changes, layout modifications); electrical permits if adding new lighting, outlets, or ventilation; mechanical permits if HVAC work is involved. Even if you're not changing the shower's footprint, permits are usually required for complete shower replacements in basements due to waterproofing requirements and below-grade considerations. Always check with your local building department before starting work—requirements vary by municipality. Benefits of proper permitting include: ensuring work meets current building codes and safety standards, protecting your homeowner's insurance coverage (unpermitted work may void coverage), providing inspection verification of critical waterproofing (especially important in basements), ensuring proper plumbing and electrical safety, maintaining home resale value (buyers and title companies often check for permits), and avoiding expensive corrective work if unpermitted work is discovered during home sale. Permit costs are typically modest ($200-$500 depending on scope) compared to project total cost, and inspections provide valuable third-party verification that work was done correctly. Professional contractors familiar with local requirements (like our team serving Littleton and the Denver metro area) handle permit applications and coordinate inspections as part of normal project workflow. Any contractor who suggests skipping permits to 'save money' should be avoided—this is a major red flag indicating substandard work practices.
Ready to Transform Your Basement Bathroom?
Stop avoiding that outdated basement shower. Whether you have an old fiberglass stall taking up space or a cramped tile shower that needs updating, we can help you create a beautiful, functional bathroom you'll actually want to use.
Serving Littleton, Highlands Ranch, Centennial, Englewood, and all Denver Metro communities
Request Your Basement Shower Quote
Professional assessment, transparent pricing, and quality craftsmanship for your basement renovation