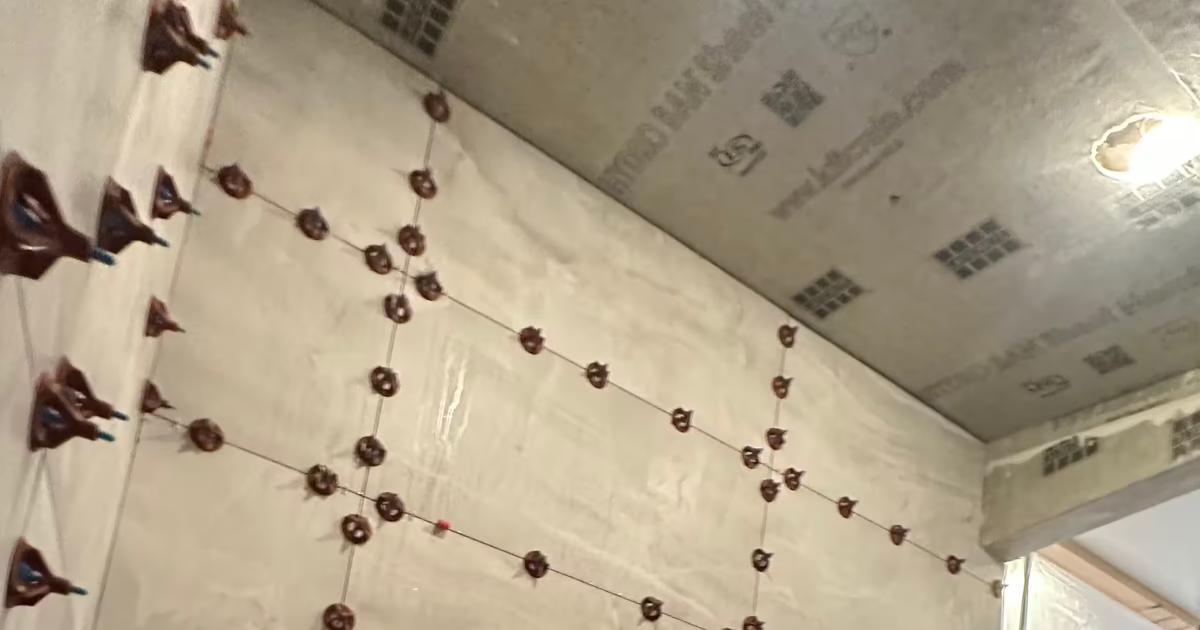
A 24x48 porcelain tile is a 2-by-4-foot straightedge that you glue to the wall and then light from the side. Every crowned stud, proud screw head and low spot in the backer board shows up as a shadow line or a raised edge, and no trowel skill hides it afterward. Here is what the industry standards ask for behind a large-format wall, why a wall framed for drywall usually fails that test, and how we build shower walls in the Denver area so the finished surface reads as one plane.
What counts as large-format, and why 24x48 is in a class of its own
For years the trade called any tile with an edge of 15 inches or more "large-format." That number was never an official definition. When the ANSI A108 and A118 tile standards were reissued in 2024, a new terminology section (A108.T) defined large-format tile as a tile "having a facial dimension greater than 23 in. (584 mm)". The 15-inch figure still matters, because it is the break point where the substrate flatness tolerance tightens, as Scott Carothers of the Ceramic Tile Education Foundation explains. A 24x48 clears both thresholds comfortably: it is large-format by the new definition and it triggers the tighter flatness rule by the old one.
What makes it different from a 12x24 is not just area. A 48-inch tile on a wall framed at 16 inches on center spans three stud bays. It cannot follow the wall; as Joshua Oduin put it in Fine Homebuilding, "large-format tile doesn't follow undulations in the substrate". It bridges them, and every bridge has two ends that stand proud of the tile next to it. Smaller tile forgives a wavy wall by bending the tile plane in tiny steps. A 24x48 does not bend, so the wall has to be right.
This article covers standard-thickness porcelain. Thin gauged panels are a different system; see our gauged porcelain installation guide. For the material choice itself, see Porcelain vs. Ceramic vs. Natural Stone for Shower Walls.
The flatness tolerance, and why a drywall-grade wall fails it
ANSI A108.02 is the industry workmanship standard that tile contractors and most manufacturers point to (it is not building code). Its substrate flatness rule has two bands, quoted here from Carothers' summary:
| Tile size | Maximum variation from plane | Local variation | Source |
|---|---|---|---|
| All edges shorter than 15 in. | 1/4 in. in 10 ft | 1/16 in. in 12 in. | ANSI A108.02 4.2.1 |
| Any edge 15 in. or longer (a 24x48 wall tile) | 1/8 in. in 10 ft | 1/16 in. in 24 in. | ANSI A108.02 4.2.2 |
An eighth of an inch over ten feet is far flatter than the framing in a typical Denver-metro tract home. Studs crown, plates sit on uneven subfloors, and a wall that was fine for painted drywall can easily be out more than the tolerance between one stud and the next. Board follows the studs; it does not fix them.
So the flattening has to happen before the board goes on. Our sequence on every large-format shower:
- Strip to the studs, then check each wall with a long straightedge and string lines, both across the studs and up each stud, and mark every high and low.
- Correct the framing: plane or shim individual studs, sister badly crowned ones, and add blocking where the niche, bench and any grab bars will land. This is the cheapest point in the job to gain flatness.
- Install the board so edges land on framing, with fasteners set flush. A proud screw head under a 24x48 is a guaranteed rocker.
- Re-check the finished board surface against the 1/8-in.-in-10-ft and 1/16-in.-in-2-ft rule before any membrane goes on, and correct remaining lows with a skim of the setting mortar, within the mortar's rated thickness.
- Waterproof, flood test the base, snap the layout, and only then open the first box of tile.
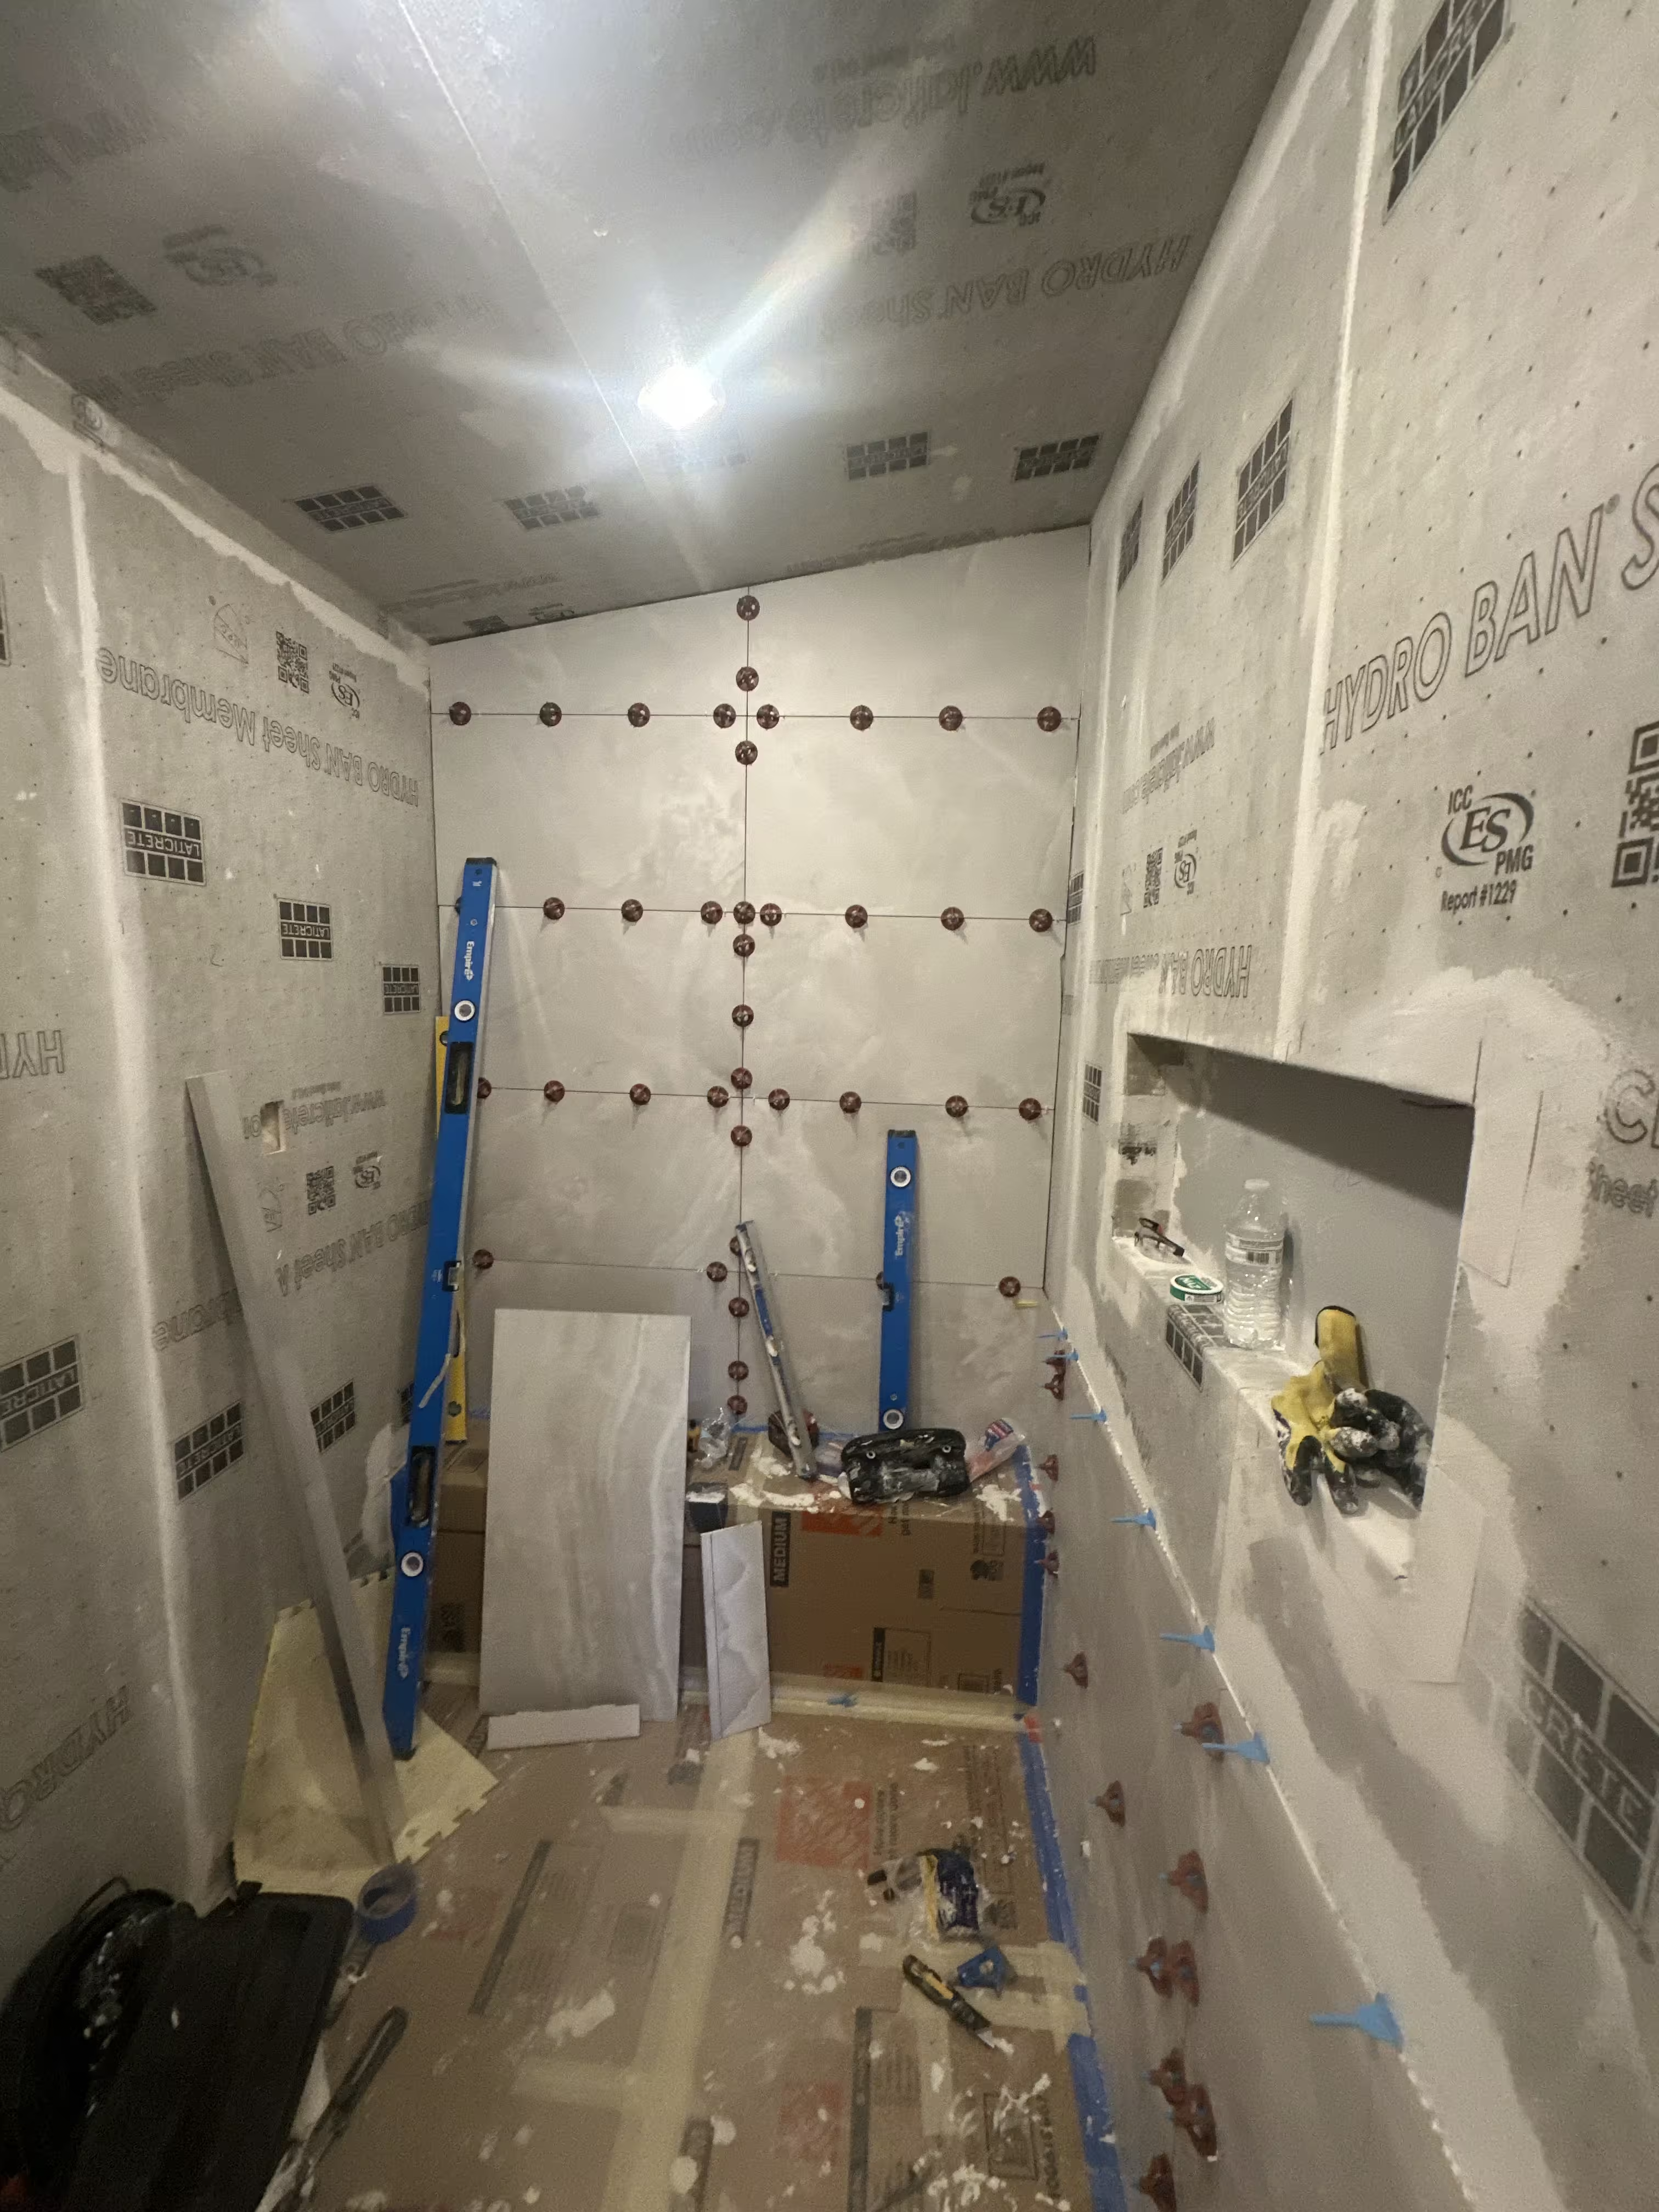
Cement board, foam board, or flatten with mortar?
Three ways to get a large-format-ready wall, each with a different cost and a different failure mode. Product requirements below are the manufacturers' published instructions; follow the sheet for the product actually on your job.
| Approach | What the manufacturer requires | Strength for 24x48 | Weakness for 24x48 |
|---|---|---|---|
| Cement backer board (e.g., USG Durock) | Studs at 16 in. o.c. maximum, framing at L/360 deflection or stiffer for tile, fasteners 8 in. o.c. A separate barrier is required if waterproof construction is specified; the board itself is water-durable, not a waterproofing. | Rigid, fastener-friendly, familiar to inspectors. Takes a liquid membrane such as HYDRO BAN well. | Follows the studs exactly, so framing errors transfer straight through. Heavy sheets, dusty cuts, and seams that must be taped and mudded flat. |
| Foam building panel (e.g., Schluter KERDI-BOARD) | Minimum 1/2 in. board for studs at 16 in. o.c., 3/4 in. for 24 in. o.c.; screws with washers; seams and fasteners sealed to make a bonded waterproofing assembly. Interior only. | Panels are flat and square out of the box and can be shimmed as they go up; waterproofing is part of the same step. Light enough that one person can carry a sheet. | Softer than cement board, so fastener and washer placement matters more and the panel can be dented before tile. Heavy tile needs the mortar to carry it until cured. |
| Flatten with mortar | Large-and-heavy-tile mortars are rated for a bed up to 3/4 in. (LATICRETE 4-XLT, MULTIMAX Lite, Custom ProLite, MAPEI Ultraflex LFT all publish that limit). | Fills a low area or a dished board face without rebuilding the wall. | Thick, uneven beds mean uneven cure, more shrinkage risk and more weight on the wall. It is a correction tool, not a plan. A wall that needs 3/4 in. of mortar needed framing work. |
We use more than one board type. Our Denver steam shower was waterproofed with a LATICRETE HYDRO BAN liquid membrane over every surface, walls, sloped ceiling, bench and niche; the Highlands Ranch shower rebuild, which replaced a failed pan from another contractor, used DensShield glass-mat gypsum backer with reinforced seams and a LATICRETE waterproofing membrane system over the wet-area walls. Which board we choose depends on the framing we find, the fixtures, and whether the homeowner wants a bench and niches built from the same panel system. The mud pan versus foam tray question is a similar trade one level down.
Mortar: large-and-heavy-tile rated, 95 percent coverage, back-buttered
A standard thinset is formulated for a thin bed under small and medium tile. A 24x48 needs more mortar under it to absorb the tile's own warpage and the wall's remaining variation, and it needs that mortar to hold roughly 33 pounds of porcelain (one tile at 9.5 mm, by a typical retail spec of 66.92 lb per two-tile box) on a vertical surface without sagging while it cures. That is what the large-and-heavy-tile category exists for. On the bag, look for ANSI A118.15 or A118.4 followed by a string of letters that includes an H. Custom Building Products lists ProLite as exceeding ANSI A118.15HET; LATICRETE lists MULTIMAX Lite as exceeding A118.15 HET and 4-XLT as exceeding A118.15 with non-sag wall performance and a bed from 3/32 in. to 3/4 in. Our Premium shower tier is built with LATICRETE products; the Essential tier uses standard-format porcelain or ceramic where a conventional thinset is appropriate.
Coverage
Manufacturers' sheets, following ANSI A108.5, require mortar contact of at least 80 percent in dry areas and 95 percent in wet areas and exteriors, with all tile edges supported. A shower wall is a wet area, so the target is 95 percent with no hollow corners. Voids are where water that gets through the grout collects, and an unsupported corner is where a 24x48 cracks if anything leans on it. The only honest way to know you hit 95 percent is to pull a tile now and then and look; MAPEI's data sheet says exactly that.
Trowel and back-buttering
Custom recommends against the common 1/2-inch square-notch trowel for this work and instead a 3/4 x 9/16 x 3/8 in. U-notch held at about 30 degrees, because rounded ridges collapse into a continuous bed when the tile is pushed perpendicular to the ridges. Then the back of the tile gets its own flat coat. Fine Homebuilding's rule is blunt: "With larger tiles, you must always back-butter the underside of each tile". The back coat fills the texture of the tile, wets the surface so the bond coat grabs, and lets the installer make up the small thickness differences that would otherwise become lippage.

Lippage, grout joints, leveling clips and the 33 percent rule
Lippage is the height difference between the edges of adjacent tiles. ANSI A108.02 ties the allowance to grout joint width, because a narrow joint makes any step visible. The 2023 edition, as summarized by Donato Pompo in The Construction Specifier:
| Grout joint width | Allowable lippage | Note |
|---|---|---|
| 1/8 in. to less than 1/4 in. | 1/32 in. plus the tile's inherent warpage | The joint most homeowners want with a 24x48 |
| 1/4 in. or wider | 1/16 in. plus the tile's inherent warpage | Rarely chosen for large-format walls |
| Gauged porcelain panels, any joint | 1/32 in., no warpage allowance | Panels are flat enough that none is added |
Three consequences follow for a 24x48 wall. First, the joint cannot be as tight as the showroom sample. The standard's running-bond rule, quoted in LATICRETE's TDS 164, requires an average joint of at least 1/8 in. for rectified tile with a long side, plus the measured edge warpage of the actual tiles. We hold 1/8 in. as the floor on these walls; narrower joints, in LATICRETE's words, "greatly exaggerate" lippage and are hard to fill with grout.
Second, the pattern is limited. Fired porcelain is never perfectly flat; the high point is usually at the center or the corners. In a 50 percent brick offset, the center (highest point) of one tile sits against the end (lowest point) of the next, which is the worst possible pairing. ANSI A108.02 therefore caps the offset at 33 percent when the side being offset is longer than 15 in. (the earlier edition said 18 in.), unless the manufacturer allows more. Stacked (grid) layouts and one-third offsets are both fine with a 24x48; a true half-offset is a request we talk a homeowner out of, or build a mock-up for first.
Third, leveling clips help, within limits. Clips and wedges pull two adjacent edges flush while the mortar sets and act as spacers, which is why they are in nearly every photo of our large-format work. But they require about 1/16 to 1/8 in. more mortar to work in, they "are not designed to take the bow out of tiles", and, as TileLetter notes, they are "often misused" and "not intended to level" a substrate. On a wavy wall a clip can make two tiles flush at the joint while their faces tilt in opposite directions, which looks fine at noon and terrible under a vanity light. Flat wall first, clips second.
Weight and framing
A 24x48 at 9.5 mm weighs about 4.3 pounds per square foot by the retail listing above, so a 5-by-8-foot shower wall of it carries roughly 170 pounds of tile before mortar. That is not a structural problem for a properly framed wall, but it does raise the bar on three details. The framing must be stiff: USG's cement-board guide requires studs at 16 in. on center and deflection no greater than L/360 for tile, and notes that large format tile may need a more rigid assembly than the minimum. The board must be thick enough for the stud spacing: Schluter specifies 1/2 in. KERDI-BOARD at 16 in. o.c. and 3/4 in. at 24 in. o.c.. And the mortar must hold the tile in place while it cures; that is the "non-sag" property every large-and-heavy-tile mortar advertises, and it is why we do not substitute a floor mortar on a wall.
Weight also changes handling: two people set a 24x48 on a wall, and a tile dropped into place rather than beaten into the bed leaves voids. The framing around an older tub surround was never checked for any of this, which is why a shower remodel that moves to large-format tile should include a framing inspection in the scope, not just a tile swap.
Mitered 45-degree corners versus metal profiles
Every shower has outside corners: the edge where the wall tile wraps a knee wall, the face of a niche, the front of a bench, the curb. With a 24x48, those edges are long, straight and very visible. There are two honest ways to finish them.
A metal profile such as Schluter-JOLLY is a 90-degree trim whose perforated anchoring leg sets in the mortar under the tile, leaving a slim metal edge that, in the manufacturer's words, "prevents tile edges from chipping." It installs fast, forgives imperfect cuts, and comes in brass, aluminum and stainless finishes. Its downside is visual: a metal line at every corner.
A 45-degree miter cuts the back of each meeting tile at 45 degrees so the two faces wrap the corner with only a hairline joint. On a marble-look porcelain, the result reads as a solid slab. This is our standard on Premium-tier showers, and the photos from our Denver steam shower show the process: the niche and outside-corner edges were cut with a diamond blade, then wet-ground and polished by hand. The trade is divided on it, and you should hear both sides. In TileLetter's August 2025 pros-and-cons piece, one contractor argues mitered edges bring "increased vulnerability to chipping" and that movement can crack the tile just beyond the miter point; another says they give a continuous look that "especially look[s] great with large-format tile and panels" and that a correctly built assembly handles the movement.
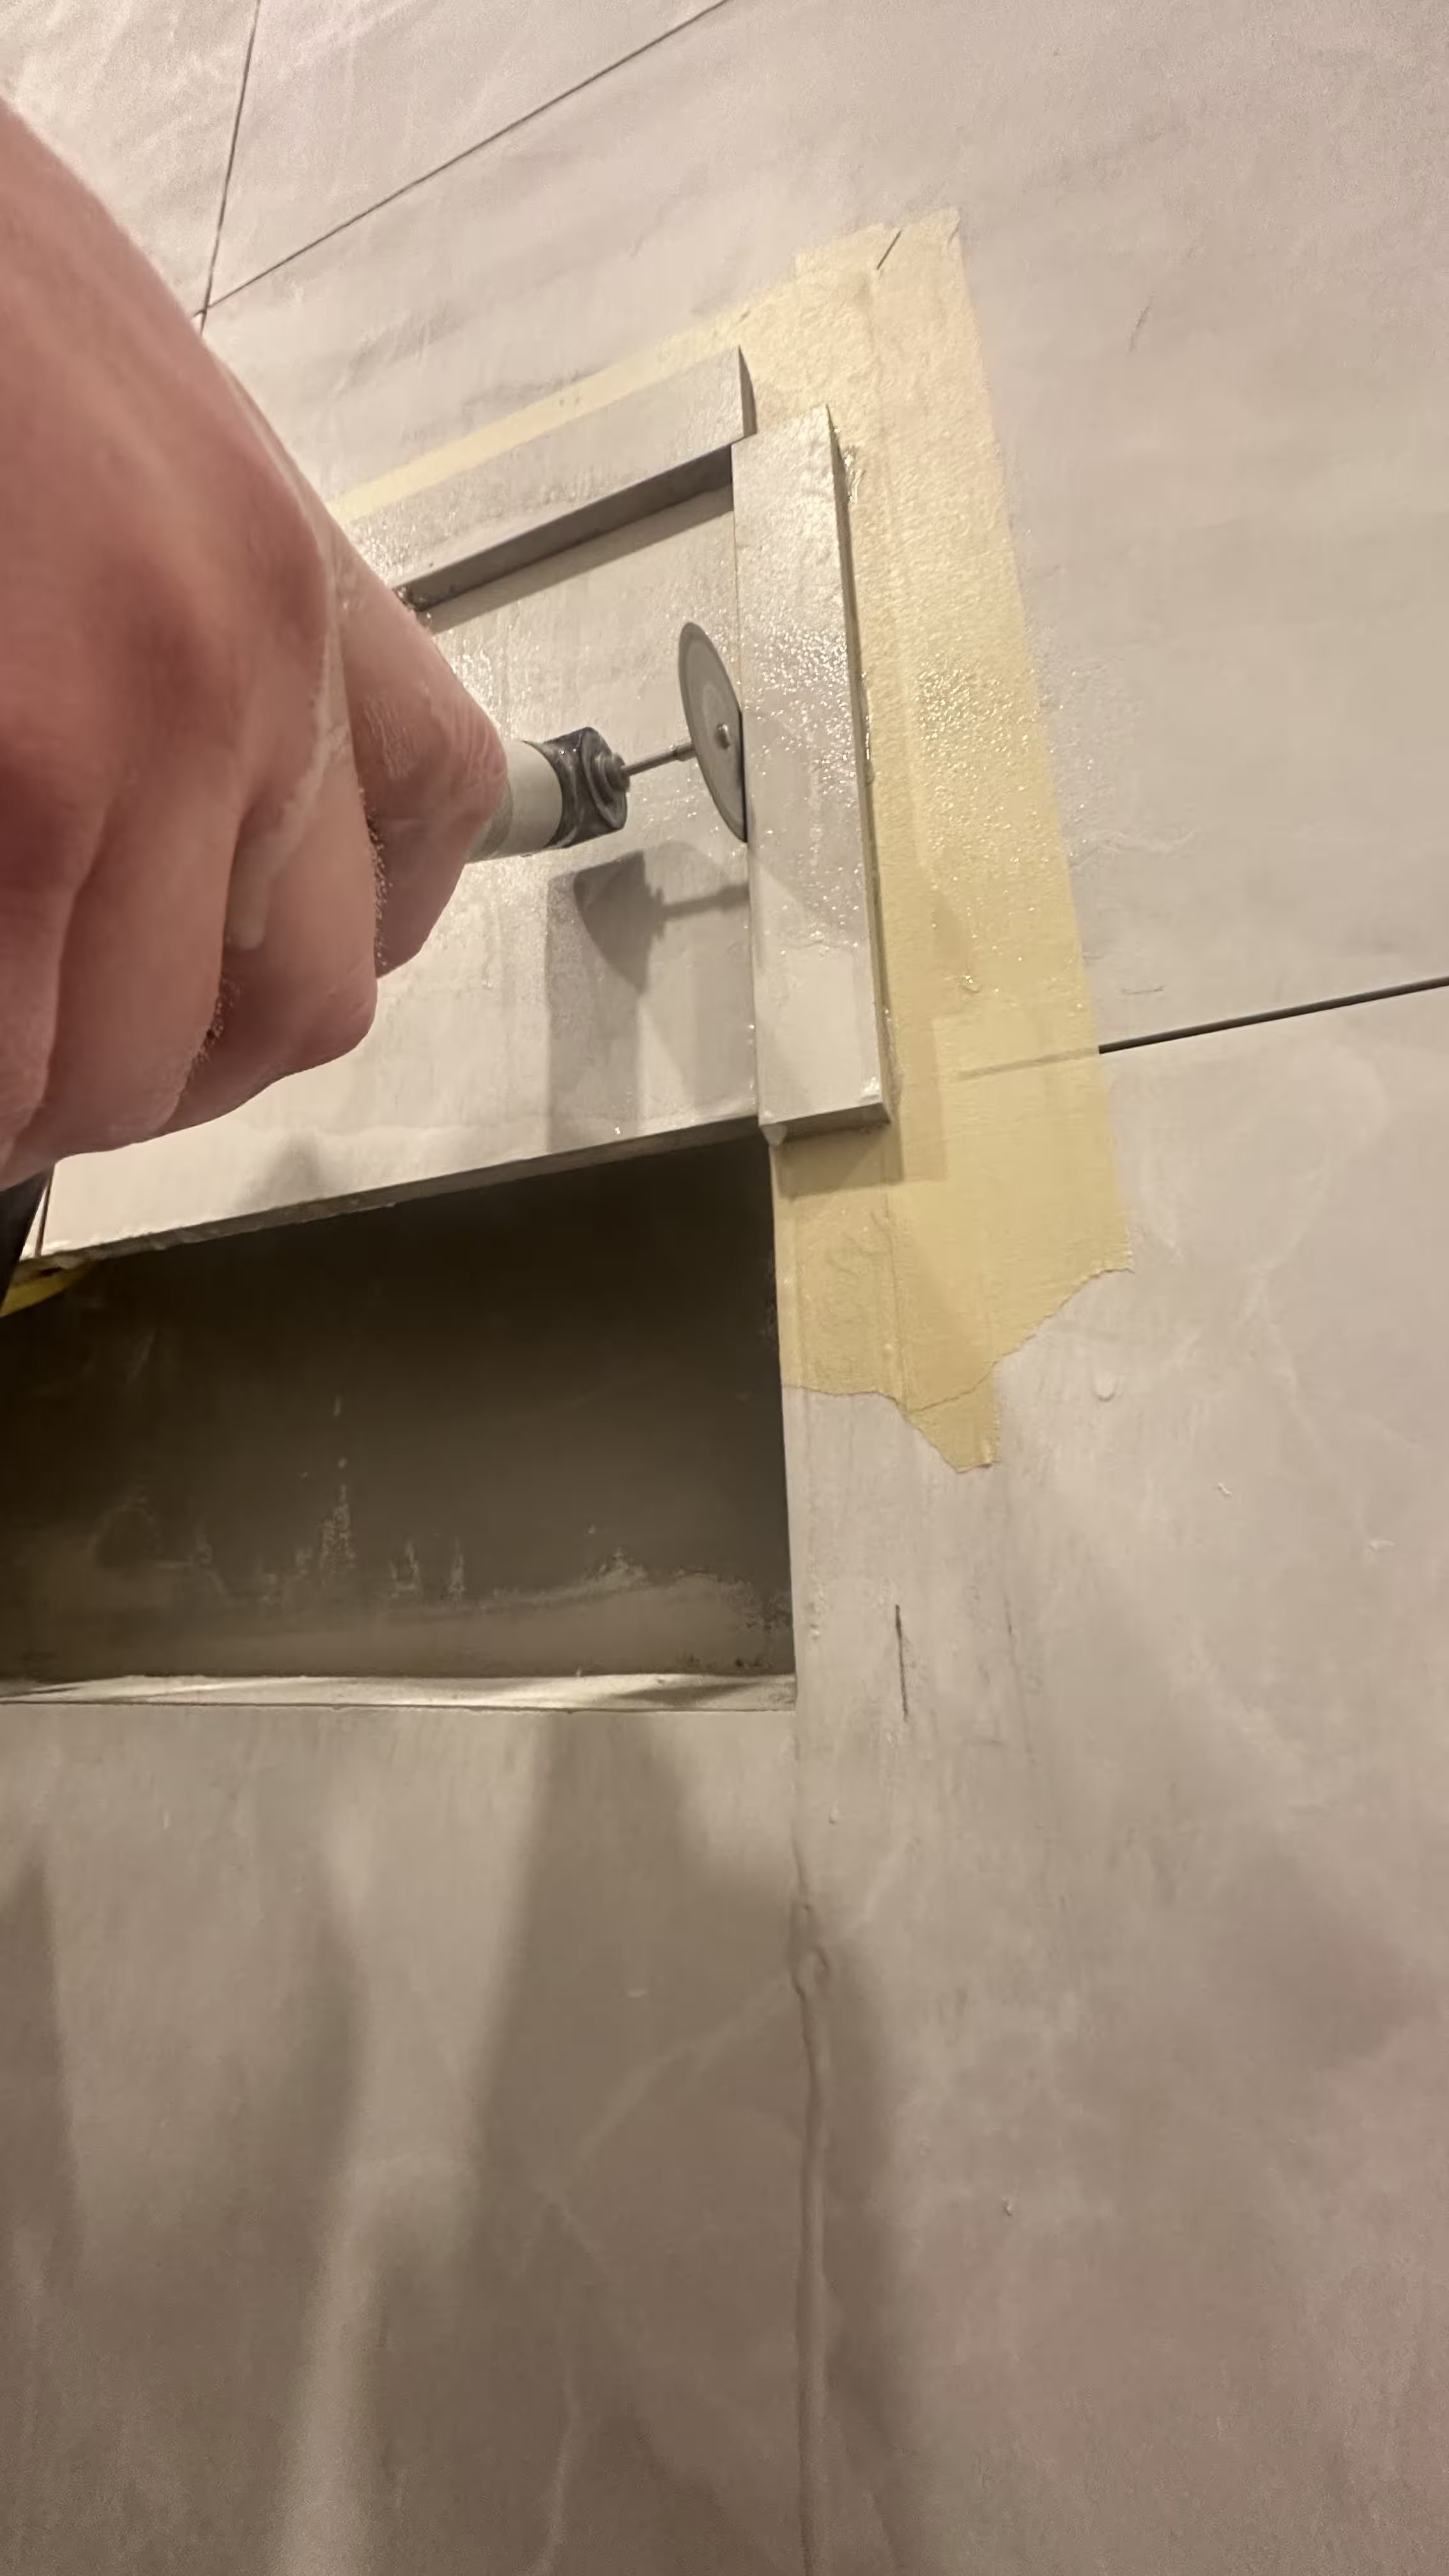
Both are right. A mitered porcelain edge is thinner than a full tile edge and has no metal protecting it. A dropped shampoo bottle that would bounce off a profile can chip a miter, and the chip shows the tile's body color under the printed face. We reduce the risk by leaving a hairline of the glazed face rather than grinding to a knife edge, by fully supporting the corner with mortar behind both tiles, and by treating the corner joint as a movement joint rather than packing it with cementitious grout. We do not promise a miter can never chip. If that worry outweighs the look for your household, a profile is the better choice, and we say so. The grout question (our Premium tier uses epoxy) is covered in Epoxy vs. Cementitious vs. Premixed Grout.
Niches, benches and the curb with a 24x48
Large tile punishes afterthoughts. Three places where it matters most:
- Niches. A niche cut into the middle of a 24x48 field leaves narrow slivers around it unless the opening is sized and positioned to the tile module before framing. We set the niche so its edges land on or near grout lines, frame and block it at the stud stage, waterproof it as part of the wall, and finish its face edges either mitered or with a profile to match the rest of the shower. In our Highlands Ranch master bath the niche interior was lined in penny mosaic, set into the large-format field, so the small tile did the work of turning the corner.
- Benches. A floating or built-in bench top in large-format tile is usually one or two pieces, which looks right but means the top must be cut precisely and must slope slightly toward the shower so water does not sit on it. The bench front is an outside corner; see the miter discussion above. Blocking for a floating bench goes in before the board.
- The curb. The curb top slopes into the shower; that is our practice on every shower so water on the curb drains back to the pan. A 24x48 cut to a 4- to 6-inch curb cap is a long, thin piece of porcelain; it needs full mortar support and is often better cut from a tile with the same face but a slightly thicker body, or from a solid-surface or stone cap the homeowner chooses to match. Curbs are also where the pan slope and liner height meet the wall tile, so the bottom course of 24x48 is cut to that geometry, not the other way around.
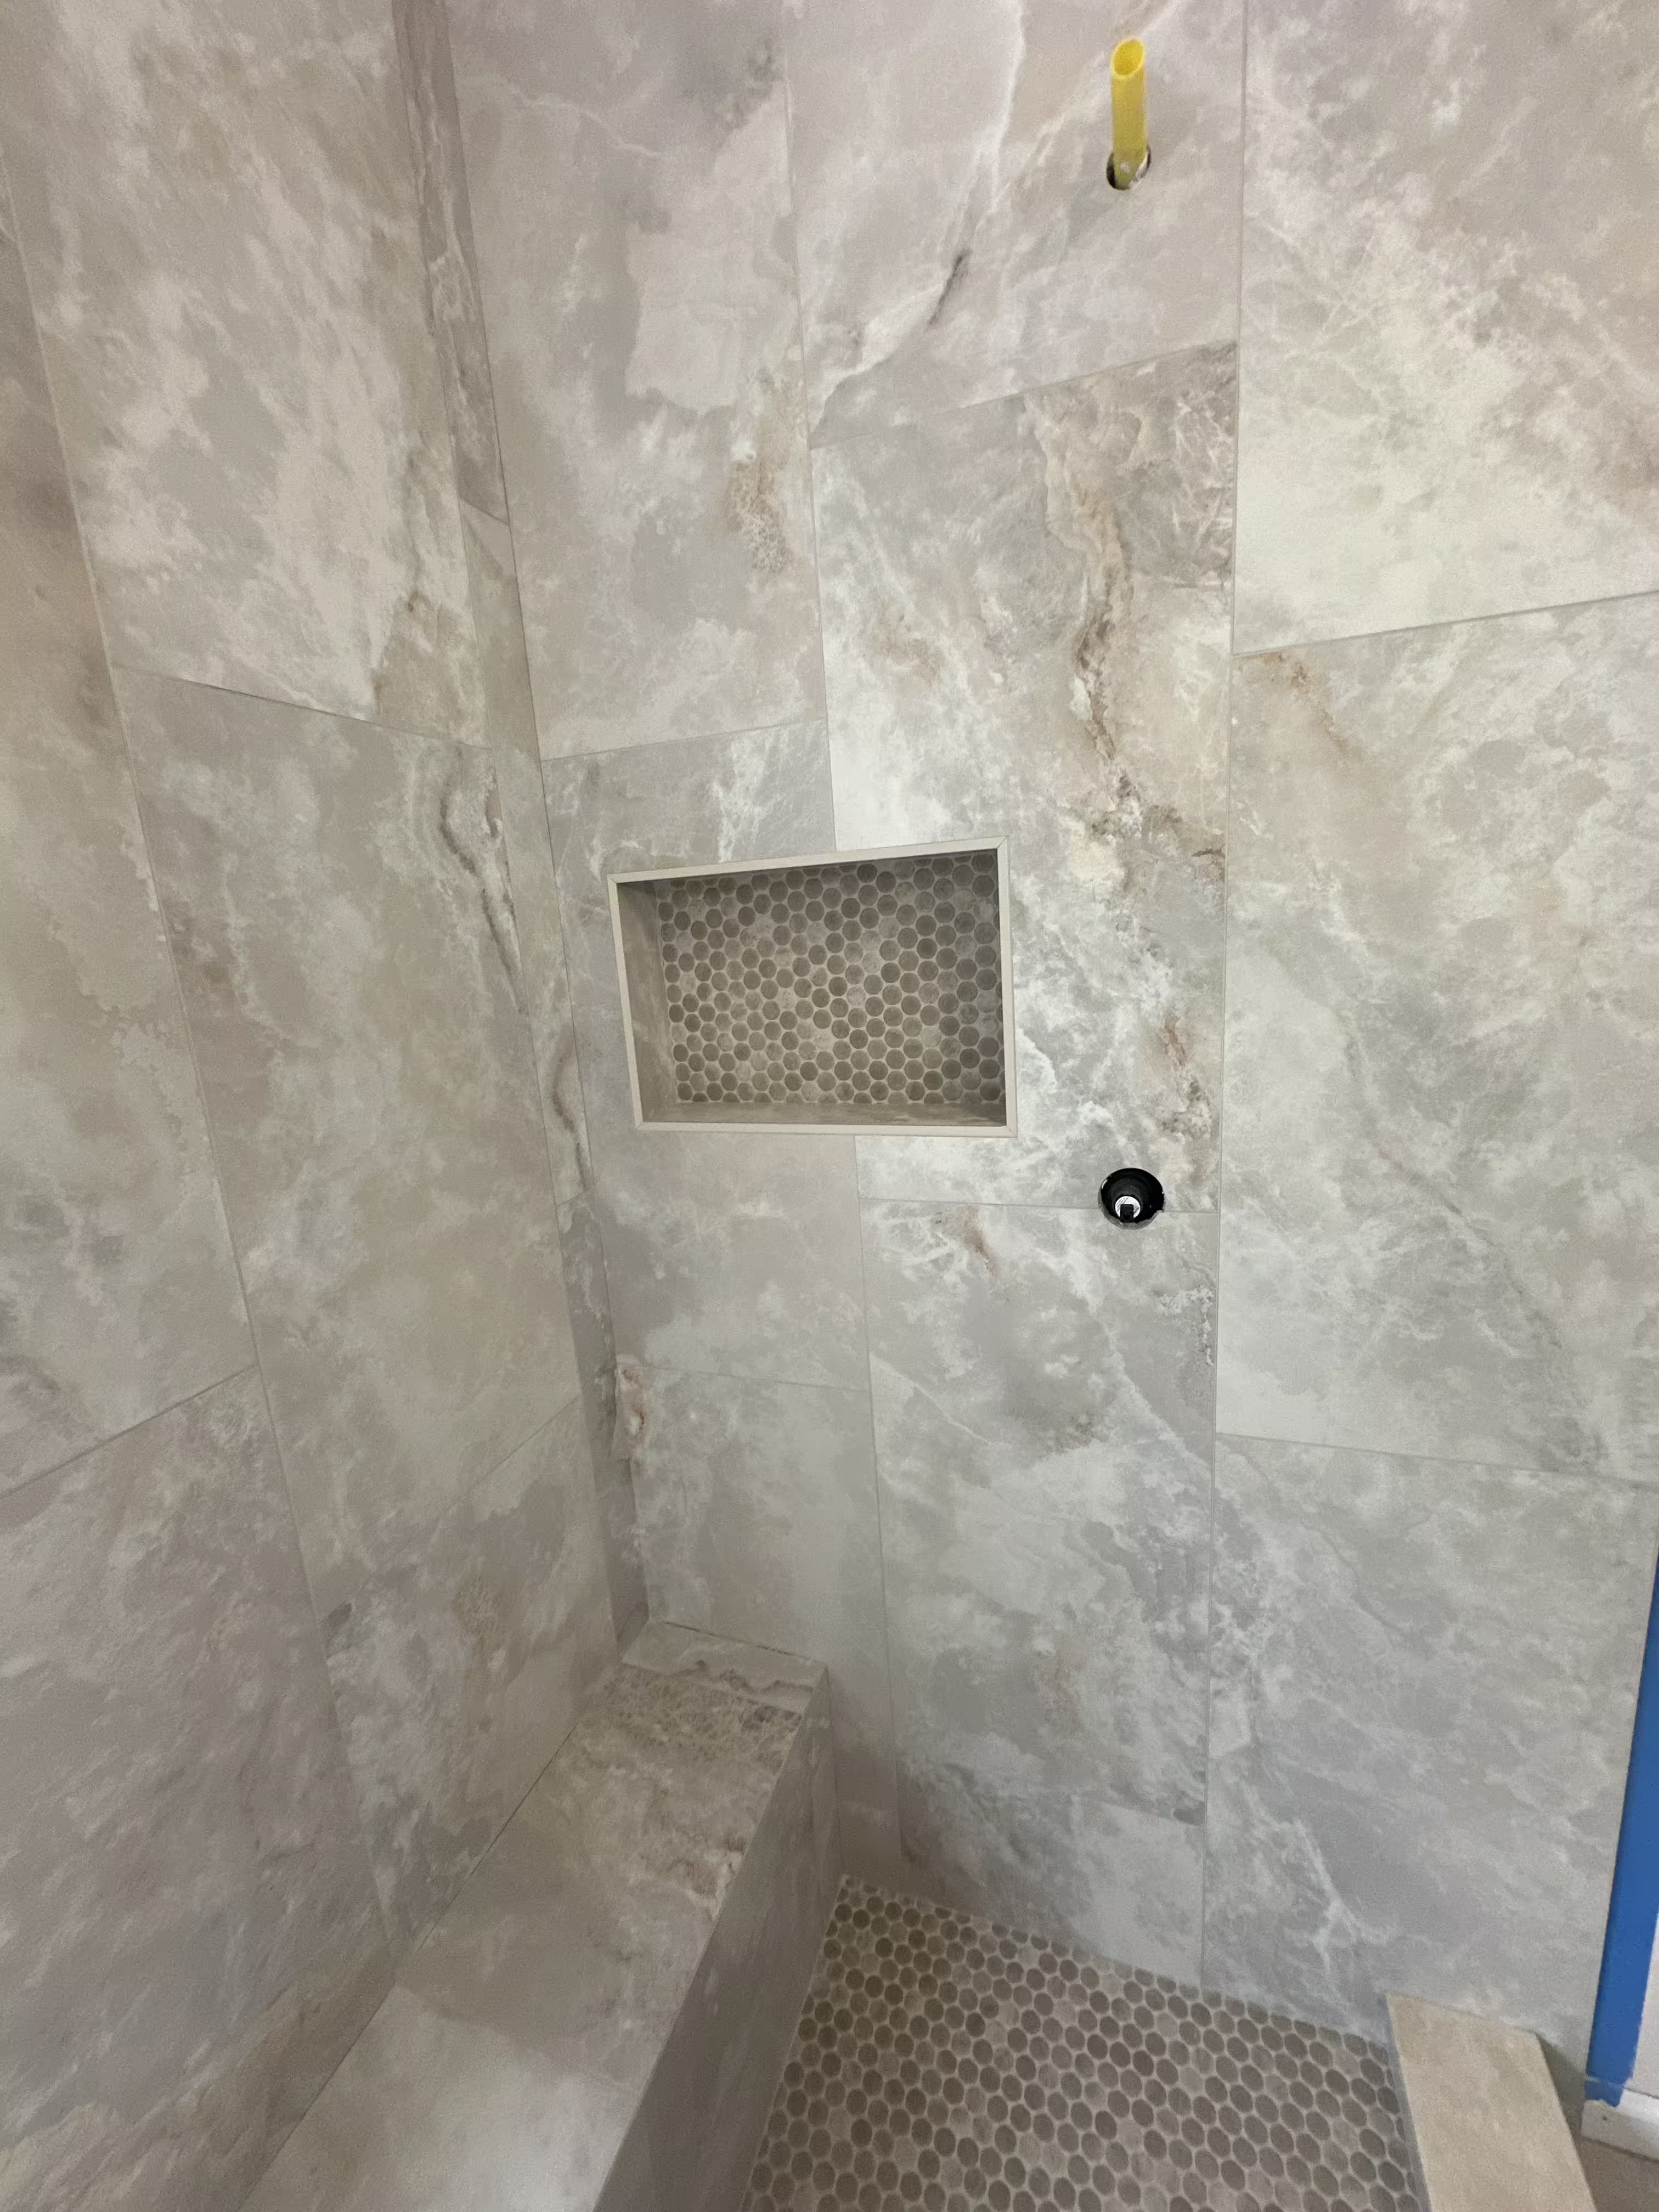
Everything above sits on the parts that keep the shower dry. Whatever the tile, every shower we build gets a code-listed membrane, a sloped base and a flood test before the first tile goes on. Flatness makes the 24x48 look right; the membrane makes it last. Site conditions, product compatibility and your local building division can all change the right method, so treat this as the standard we build to, not a universal spec.
Thinking about 24x48 porcelain for a shower or bathroom in Denver, Aurora, Parker, Centennial or Highlands Ranch? We check the framing before we quote the tile, build the wall to the large-format flatness tolerance, and tell you plainly whether a mitered corner or a profile fits your household.
Frequently asked questions
Can 24x48 tile go over my existing cement board or drywall?
Not over drywall in a shower, for waterproofing reasons unrelated to tile size. Over existing cement board, only if it meets the 1/8-in.-in-10-ft flatness rule and the wall has a working membrane. An existing shower wall almost never meets both, so we open it up.
Is a 50 percent brick-pattern offset ever acceptable with 24x48?
Only if the tile manufacturer explicitly allows it for that product, and even then we recommend a mock-up under the actual bathroom lighting first. The industry standard caps the offset at 33 percent for tiles with a long side over 15 inches because the warped center of one tile lands against the flat end of the next. Stacked and one-third offsets look modern and avoid the problem.
Why does your quote for large-format tile include framing work?
Because the wall is where flatness comes from. Shimming or sistering a few studs costs hours; a wavy large-format wall costs a redo. We price the framing corrections as their own line so you can see them.
Will the mitered corners chip?
They can. A mitered porcelain edge has no metal protecting it, and a hard knock can take a flake off that shows the tile body. We build them to minimize that risk, but if the possibility bothers you, a Schluter-style profile is the right answer and we will install it without argument.
Sources and notes
- Scott Carothers, FLOOR Trends / CTaSC: How to Define Large-Format Tile and Its Subfloor Requirements — August 2024. ANSI A108.T (2023) defines large-format tile as a facial dimension greater than 23 in. (584 mm); the 15 in. figure was an industry assumption. ANSI A108.02 flatness: 1/4 in. in 10 ft and 1/16 in. in 12 in. for tiles with all edges under 15 in.; 1/8 in. in 10 ft and 1/16 in. in 24 in. for tiles with any edge 15 in. or longer.
- TileLetter / NTCA Ask the Experts: Large-format tile definition — March 2025. Quotes the A108.T definition verbatim.
- TileLetter: Lippage in tile installation — May 2025. Lippage allowances by joint width; larger tiles more prone to lippage; lippage tuning systems are 'often misused' and 'not intended to level a floor'.
- Donato Pompo, The Construction Specifier: Tile and Stone Lippage, What is Acceptable — September 2025. ANSI A108.02-2023 section 4.4 lippage values; section 4.5.2: offset limited to 33% when the offset side is longer than 15 in. unless the manufacturer says otherwise; warpage concentrates at corners or center; mock-ups under the specified lighting.
- LATICRETE TDS 164: Lippage, Causes and Prevention — Quotes the earlier ANSI A108.02 text: minimum 1/8 in. average joint for rectified tile in running bond with any side over 18 in., plus the edge warpage; 33% maximum offset (earlier edition used 18 in.); joints 1/8 in. or narrower 'greatly exaggerate' lippage; square-edge tile shows lippage more than chamfered.
- Custom Building Products: ProLite Premium Large Format Tile Mortar — Exceeds ANSI A118.15HET; non-sag, non-slump, medium bed up to 3/4 in.; coverage at least 80% dry and 95% wet with all edges supported; recommends a 3/4 x 9/16 x 3/8 in. U-notch over a 1/2 in. square notch; flat back-troweling (formerly back-buttering).
- LATICRETE: 4-XLT — Exceeds ANSI A118.15, A118.4 and A118.11; non-sag wall installations; bonding mortar from 3/32 in. up to 3/4 in. without shrinkage.
- LATICRETE: MULTIMAX Lite — Exceeds ANSI A118.15 HET, A118.4 and A118.11; 'maximum non-sag performance on walls'; fiber-reinforced; 25 lb bag covers what 50 lb of traditional mortar covers.
- MAPEI: Ultraflex LFT technical data sheet (third-party hosted copy) — 'Nonsag formula for large-format tile and stone in wall applications'; medium bed up to 3/4 in.; back-butter where needed to reach coverage, referencing ANSI A108.5; lift tiles periodically to check coverage. Older sheet; check MAPEI's current data sheet for the ANSI A118.15 listing.
- Robin Nicholas and Michael Schweit, Fine Homebuilding: Large-Format Tiles — 'With larger tiles, you must always back-butter'; bigger notched trowel and 1/16 to 1/8 in. more thinset to make room for leveling clips; most manufacturers recommend 33% rather than 50% overlap.
- Joshua Oduin, Fine Homebuilding: Choosing a Tile Leveling System — Issue 310, 2022. 'Large-format tile doesn't follow undulations in the substrate'; levelers depend on a flat substrate and uniform thinset; spinners tested on large-format wall tile.
- RUBI blog: Levelling clips — 2025. 'Levelling clip systems are not designed to take the bow out of tiles.'
- USG: Durock Brand Cement Board Systems guide (SA321624) — Walls: maximum stud spacing 16 in. o.c.; framing not to exceed L/360 deflection for tile; fasteners 8 in. o.c.; the board 'does not deteriorate in the presence of water' but a separate barrier is required if waterproof construction is specified; large format tile may require a more rigid assembly.
- Schluter-Systems: KERDI-BOARD — Extruded polystyrene panel with reinforcement and fleece on both sides; thicknesses 3/16 in. to 2 in.; substrates 'flat, level, plumb, square, and dimensionally stable'; minimum 1/2 in. board for studs at 16 in. o.c., 3/4 in. for 24 in. o.c.; bonded waterproofing assemblies; not for exterior use.
- Schluter-Systems: Schluter-JOLLY finishing and edge-protection profile — 90-degree profile for outside wall corners; 'prevents tile edges from chipping'; perforated anchoring leg set in the mortar bond coat; integrated joint spacer; brass, aluminum and stainless finishes.
- TileLetter: Mitering tile and stone, pros and cons — August 2025. Woody Sanders: mitered edges mean 'increased vulnerability to chipping' and movement can crack the tile just beyond the miter. Pavlo Starykov: a continuous look that 'especially look[s] great with large-format tile and panels'; a well-built assembly handles movement. Profiles presented as the alternative.
- LATICRETE: HYDRO BAN — Liquid-applied waterproofing and crack-isolation membrane; exceeds ANSI A118.10 and A118.12; 0.020 to 0.030 in. cured; flood test allowed in 2 hours at 70°F or higher.
- Tango Tile: Sahara 24 x 48 matte porcelain (retail listing used for weight) — Rectified, 9.5 mm; two pieces per box; 15.5 sq ft; 66.92 lb per box, about 33 lb per tile and 4.3 lb per sq ft. One product; weights vary by line.
- South Denver Tile Experts: Steam shower installation, Denver (project record) — Large-format marble-look porcelain over HYDRO BAN, set on leveling clips, with 45-degree mitered niche and outside corner edges.
Code references are to the model International Residential Code (IRC). Denver, Aurora, Parker and other metro jurisdictions adopt different editions with local amendments, so confirm requirements with your building division before relying on them. Last reviewed October 26, 2026.